Love this? Save it for later!
Share the inspiration with your friends
“I wasn’t expecting to find the perfect Easter dessert recipe in the middle of a chaotic grocery run,” my friend Lisa confessed as she handed me a crinkled note she had scribbled on her shopping list. It was a hectic Saturday afternoon, the kind where the store is packed, the kids are restless, and all you want is something quick and fuss-free. That’s when she discovered these Easy No-Bake 4-Ingredient Easter Cheesecake Cups—a game changer for last-minute celebrations.
Honestly, the idea of a cheesecake that doesn’t require an oven, fancy ingredients, or hours of prep sounded almost too good to be true. But let me tell you, the first time I made these, I was sitting on my kitchen floor, half-listening to the kids argue over crayons, and halfway through, I realized this recipe was going to stick with me. You know that feeling when a dessert tastes creamy, dreamy, and fresh but doesn’t have you sweating over a hot kitchen? Yeah, it’s exactly that.
Maybe you’ve been there—Easter Sunday sneaks up, and you’re scrambling to throw together something sweet that looks festive but isn’t a full-day project. These cheesecake cups came to my rescue more than once, and the best part is how simple they are. Four ingredients, no baking, and a touch of springtime charm that makes them perfect for Easter or any cheerful gathering.
Why You’ll Love This Recipe
Let me share why this recipe has become a staple in my dessert rotation. After trying countless versions of no-bake cheesecakes, this one stands out because it’s:
- Quick & Easy: Ready in under 15 minutes, perfect for busy weekend afternoons or unexpected guests.
- Simple Ingredients: Just four pantry staples you probably have on hand—cream cheese, whipped topping, graham crackers, and powdered sugar.
- Perfect for Easter and Spring Celebrations: Light, fresh, and cute, these cups bring a festive vibe without the fuss.
- Crowd-Pleaser: Made these for a neighborhood potluck, and even the pickiest eaters went back for seconds.
- Unbelievably Delicious: The creamy texture with a crumbly base hits that perfect balance between indulgent and refreshing.
What sets this recipe apart is the effortless blend of flavors and textures. No complicated steps, no special equipment, just a smooth, luscious cheesecake filling layered over crunchy crust, all served in cute individual cups. I mean, who doesn’t love a dessert that’s both pretty and practical? Whether you’re eyeing something easy for brunch or a sweet ending to a cozy dinner, these cheesecake cups have got you covered.
Plus, the no-bake method means you’re not heating up the kitchen when spring is finally nudging us toward warmer days. It’s honestly the kind of recipe that makes you close your eyes after the first bite and smile—simple pleasures, right?
What Ingredients You Will Need
This recipe uses simple, wholesome ingredients to deliver bold flavor and satisfying texture without the fuss. These ingredients are pantry staples, easy to find, and perfect for quick assembly.
- Cream Cheese (8 oz / 225 g), softened: The star of the cheesecake filling, giving that rich and tangy taste. I recommend full-fat cream cheese for the creamiest results.
- Powdered Sugar (1 cup / 120 g): Adds sweetness and smoothness to the filling. Sift it before mixing to avoid lumps.
- Whipped Topping (1 cup / 240 ml): Use store-bought whipped topping like Cool Whip or homemade whipped cream. It lightens the texture beautifully.
- Graham Crackers (about 1 ½ cups / 150 g), crushed: For the crunchy base. I prefer the honey-flavored variety for a subtle sweetness, but plain works too.
- Butter (5 tbsp / 70 g), melted: To bind the graham cracker crumbs and add a buttery richness. Unsalted butter is best here.
Optional:
- Mini Easter candies or fresh berries: For garnish and festive flair.
If you’re looking for a gluten-free option, you can swap graham crackers with gluten-free cookie crumbs—trust me, it still works like a charm. And for a dairy-free adaptation, try using coconut cream cheese and dairy-free whipped topping.
Equipment Needed
For this recipe, you really don’t need much—just the basics.
- Mixing bowls: One medium bowl for the crust, another for the filling.
- Electric mixer or hand whisk: While you can whisk by hand, an electric mixer makes the filling super smooth and fluffy.
- Measuring cups and spoons: Precision matters, especially with powdered sugar.
- Spatula: For folding the whipped topping gently into the cream cheese mixture.
- Serving cups or jars: I like using small clear plastic cups or mason jars for a cute presentation.
No fancy tools here, which is why I keep coming back to this recipe. If you want to crush the graham crackers without a bag and rolling pin, a food processor works great and saves time. Also, if you use an electric mixer, just be mindful not to overbeat—the filling can turn too loose.
Preparation Method

- Prepare the crust: In a medium bowl, mix 1 ½ cups (150 g) of crushed graham crackers with 5 tablespoons (70 g) of melted unsalted butter. Stir until the crumbs are evenly coated and feel like wet sand. This step takes about 5 minutes.
- Assemble the crust base: Spoon the crumb mixture into your serving cups, pressing gently with the back of a spoon or your fingers to create a firm, even layer. Place cups in the refrigerator while you prepare the filling. This chilling helps the crust set properly.
- Make the cheesecake filling: In a separate bowl, beat 8 oz (225 g) softened cream cheese with 1 cup (120 g) powdered sugar until smooth and creamy—about 2-3 minutes with an electric mixer. Don’t rush; lumps are the enemy here.
- Fold in whipped topping: Gently fold 1 cup (240 ml) of whipped topping into the cream cheese mixture using a spatula. Take your time to keep it light and airy; this takes roughly 2 minutes.
- Fill the cups: Spoon or pipe the cheesecake filling over the chilled crust layer, smoothing the tops with a spatula or the back of a spoon. Leave a little space at the top if you plan to add garnishes.
- Chill before serving: Refrigerate the assembled cheesecake cups for at least 2 hours (or overnight if you have the time). This resting period gives the flavors time to meld and the filling to firm up.
- Decorate and serve: Just before serving, top with mini Easter candies, fresh berries, or a sprinkle of crushed graham crackers for extra charm.
Pro tip: If your cream cheese isn’t soft enough, microwave it for 10 seconds at a time, checking after each burst. Also, avoid overmixing after adding the whipped topping to keep the texture just right.
Cooking Tips & Techniques
From my trials with this recipe, a few things make all the difference.
- Softened cream cheese is key: If it’s too cold, the filling becomes lumpy and harder to mix. Let it sit at room temperature for about 30 minutes.
- Don’t skip sifting the powdered sugar: It ensures a silky filling without gritty spots.
- Crush graham crackers finely: Coarser crumbs won’t bind as well and can make the crust crumbly.
- Gentle folding: When combining the whipped topping with cream cheese, fold gently to keep the airiness intact. Overmixing can make it dense.
- Chill long enough: This recipe needs at least 2 hours of chilling to set properly; otherwise, it can be too soft.
One time, I forgot to chill the crust before adding the filling—big mistake! The crust crumbled apart when scooping, so don’t skip that step. Also, multitasking helps here: prepare the crust, pop it in the fridge, then whip the filling. Saves time and keeps things tidy.
Variations & Adaptations
This recipe is super flexible, so you can switch it up depending on your mood or dietary needs.
- Fruit Swaps: Instead of classic graham crackers, try crushed digestive biscuits or Oreo crumbs for a chocolate twist.
- Flavor Boosts: Add a teaspoon of vanilla extract or a touch of lemon zest to the filling for extra zing.
- Dietary Adjustments: For a vegan version, use dairy-free cream cheese and whipped topping, plus gluten-free cookies for the crust.
- Seasonal Twists: Top with fresh strawberries or mango chunks in summer, or sprinkle toasted coconut for a tropical vibe.
- Personal Favorite: I once stirred in a handful of mini chocolate chips into the filling before folding in whipped topping—total crowd-pleaser!
Serving & Storage Suggestions
Serve these cheesecake cups chilled straight from the fridge for the best texture and taste. They’re perfect on a pastel-colored platter for Easter brunch or as individual treats at a spring gathering.
Pair them with a light herbal tea or a glass of sparkling lemonade to complement the creamy sweetness.
Store leftover cups covered tightly in the refrigerator for up to 3 days. If you want to prepare in advance, these freeze beautifully—just thaw in the fridge overnight before serving. Keep in mind the whipped topping might become a little less fluffy after freezing, but the taste remains spot on.
Flavors tend to meld and become richer the next day, so if you’re not in a rush, prepping a day ahead is a smart move.
Nutritional Information & Benefits
Each serving of these cheesecake cups (about 1 small cup) roughly contains:
| Calories | 220 |
|---|---|
| Fat | 15g |
| Carbohydrates | 18g |
| Protein | 3g |
The cream cheese provides a decent source of calcium and protein, while the whipped topping keeps the dessert light. Using real butter and whole graham crackers adds some healthy fats and fiber, respectively.
This recipe is gluten-friendly if you opt for gluten-free crackers, and can be adapted for dairy-free diets. Just be mindful of powdered sugar if you’re watching sugar intake.
I love that this dessert feels indulgent but stays relatively simple and wholesome compared to heavily processed sweets. It’s a nice way to treat yourself during the holidays without feeling weighed down.
Conclusion
If you’re looking for a fuss-free, delicious Easter dessert that doesn’t demand hours in the kitchen, these Easy No-Bake 4-Ingredient Easter Cheesecake Cups should be your go-to. They combine creamy, tangy filling with a crunchy base, all in a neat little package that’s as pretty as it is tasty.
Feel free to experiment with toppings or add your own spin—this recipe is forgiving and flexible. I keep making it because it’s so quick, reliable, and honestly, it just makes me smile every time.
Give it a try this holiday, and I’d love to hear how you customize it! Drop your thoughts or photos in the comments below and share the joy of simple, sweet celebrations.
Frequently Asked Questions
Can I make these cheesecake cups ahead of time?
Absolutely! Prepare them up to 2 days in advance and keep refrigerated. They even taste better after resting overnight.
What can I use if I don’t have graham crackers?
You can substitute with digestive biscuits, vanilla wafers, or crushed cookies like Oreos for a chocolatey twist.
Is it possible to make this recipe vegan?
Yes! Use dairy-free cream cheese and whipped topping, and gluten-free cookies for the crust to keep it vegan-friendly.
How do I prevent the filling from being lumpy?
Make sure your cream cheese is fully softened and sift the powdered sugar before mixing. Beat the cream cheese until smooth before folding in the whipped topping gently.
Can I freeze these cheesecake cups?
Yes, you can freeze them. Just thaw in the fridge overnight before serving. The texture of the whipped topping may be slightly different but still delicious.
Pin This Recipe!
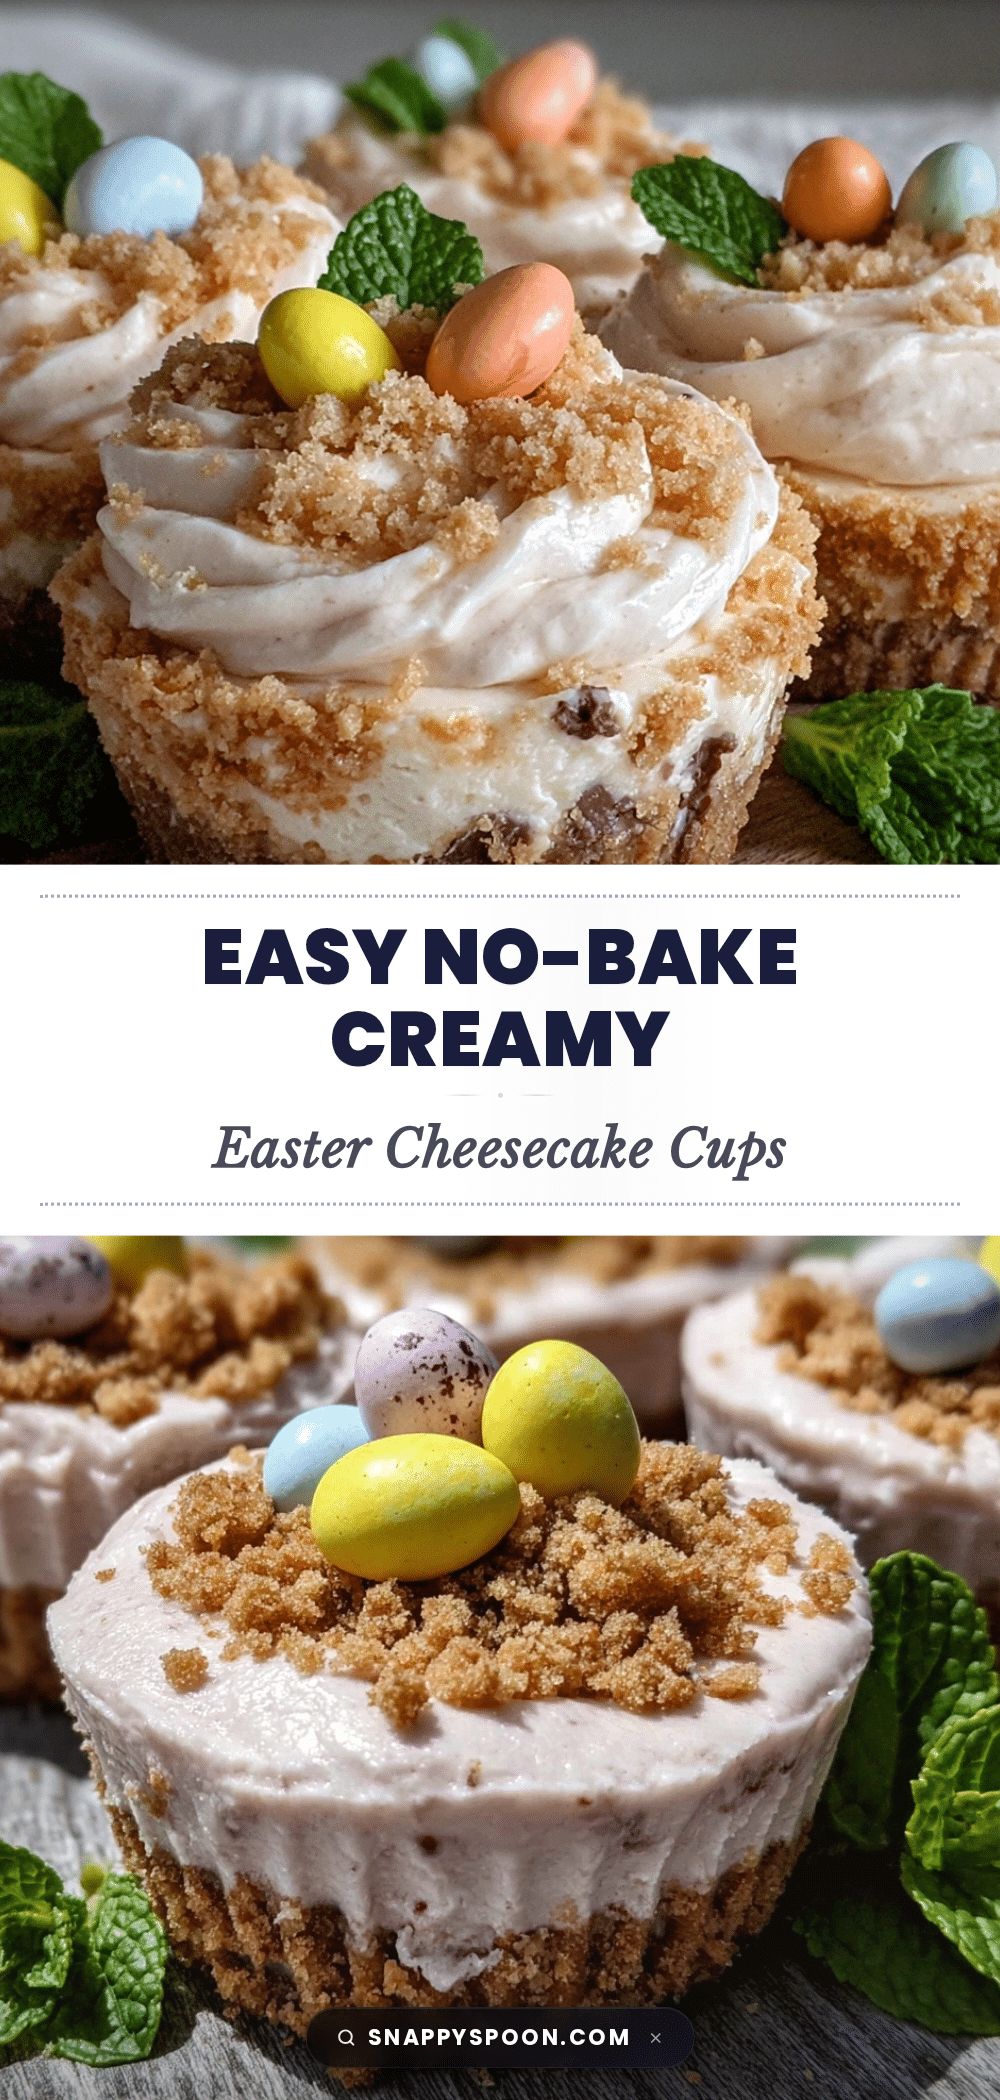
Easy No-Bake 4-Ingredient Easter Cheesecake Cups

A quick and easy no-bake cheesecake dessert made with just four simple ingredients, perfect for Easter or any festive gathering.
- Prep Time: 10 minutes
- Cook Time: 0 minutes
- Total Time: 2 hours 10 minutes
- Yield: 6 servings 1x
- Category: Dessert
- Cuisine: American
Ingredients
- 8 oz (225 g) cream cheese, softened
- 1 cup (120 g) powdered sugar, sifted
- 1 cup (240 ml) whipped topping (store-bought or homemade)
- 1 ½ cups (150 g) graham crackers, crushed
- 5 tbsp (70 g) unsalted butter, melted
- Optional: mini Easter candies or fresh berries for garnish
Instructions
- Prepare the crust: In a medium bowl, mix 1 ½ cups (150 g) crushed graham crackers with 5 tablespoons (70 g) melted unsalted butter until crumbs are evenly coated and feel like wet sand (about 5 minutes).
- Assemble the crust base: Spoon the crumb mixture into serving cups, pressing gently to create a firm, even layer. Refrigerate the cups while preparing the filling.
- Make the cheesecake filling: Beat 8 oz (225 g) softened cream cheese with 1 cup (120 g) powdered sugar until smooth and creamy (2-3 minutes with an electric mixer).
- Fold in whipped topping: Gently fold 1 cup (240 ml) whipped topping into the cream cheese mixture using a spatula, keeping it light and airy (about 2 minutes).
- Fill the cups: Spoon or pipe the cheesecake filling over the chilled crust layer, smoothing the tops. Leave space for garnishes if desired.
- Chill before serving: Refrigerate assembled cheesecake cups for at least 2 hours or overnight to set.
- Decorate and serve: Top with mini Easter candies, fresh berries, or crushed graham crackers just before serving.
Notes
Use softened cream cheese to avoid lumps. Sift powdered sugar before mixing. Crush graham crackers finely for best crust texture. Fold whipped topping gently to keep filling airy. Chill at least 2 hours for proper setting. Can substitute gluten-free cookies for gluten-free option and dairy-free cream cheese and whipped topping for dairy-free adaptation.
Nutrition
- Serving Size: 1 small cup
- Calories: 220
- Fat: 15
- Carbohydrates: 18
- Protein: 3
Keywords: no-bake cheesecake, Easter dessert, easy cheesecake cups, 4-ingredient dessert, quick cheesecake, no oven dessert