Love this? Save it for later!
Share the inspiration with your friends
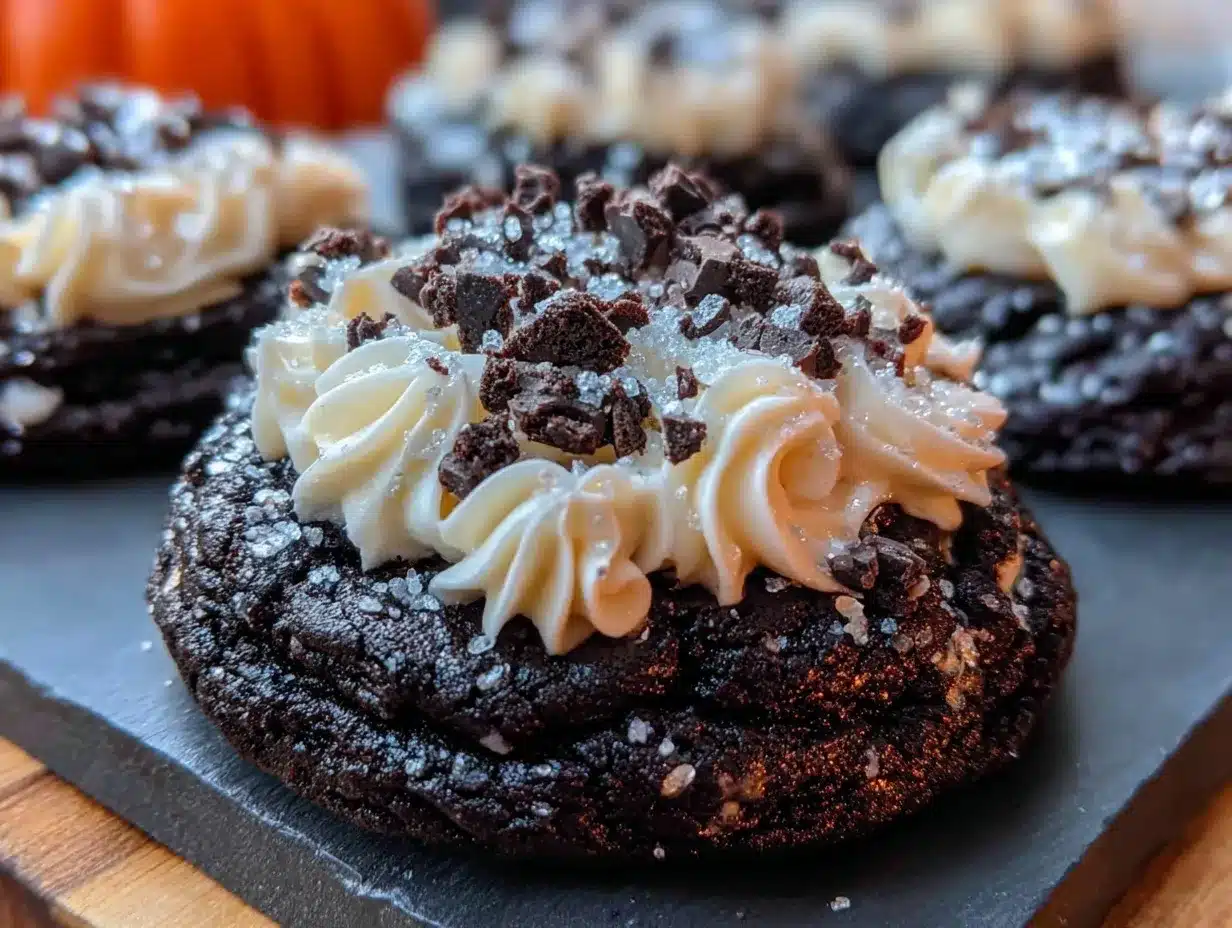
“I wasn’t expecting to find a recipe for black velvet sugar cookies scribbled on the back of a coffee shop receipt,” I told my friend Jessie, laughing as I carefully unfolded the crinkled paper. It was last fall, during one of those chilly Sunday mornings when the café was too crowded, and I ended up sitting next to a graphic designer named Max. Between sips of his double espresso, he shared the story behind these strikingly elegant cookies he’d baked for a gallery opening. The deep, rich black dough combined with the crisp, glossy royal icing decorations reminded me a bit of a chalkboard — sophisticated, bold, and a tad mysterious.
The idea stuck with me. I mean, who knew that sugar cookies could look so dramatic and refined? I tried recreating Max’s recipe at home one afternoon, fueled by curiosity and a black food coloring mishap that stained my favorite apron. Honestly, the first batch came out a little too dense, and I messed up the icing consistency entirely. But after tweaking the recipe and testing different royal icing techniques, I landed on the perfect balance: soft, tender black velvet sugar cookies with just the right amount of sweetness and a smooth, matte finish for the icing that looks like real chalk art.
Maybe you’ve been there too — wanting to wow guests with something both beautiful and delicious but feeling a bit intimidated by elaborate decorating. These chalkboard black velvet sugar cookies are exactly the kind of treat that’s deceptively simple but makes a statement. They’re elegant enough for a bridal shower or a sophisticated afternoon tea, yet easy enough to bake on a cozy weekend. Let me tell you, once you try this recipe, you’ll wonder why you haven’t made black sugar cookies before!
Why You’ll Love This Recipe
After many attempts — and a few frosting disasters — I’ve perfected this elegant chalkboard black velvet sugar cookies recipe with royal icing that’s as stunning as it is tasty. Here’s why this recipe stands out and why you’ll want to keep it in your baking arsenal:
- Quick & Easy: These cookies come together in about 45 minutes, including decorating time, making them perfect for last-minute events or spontaneous baking sessions.
- Simple Ingredients: No obscure baking supplies needed — just pantry staples and a few cake-quality ingredients for that signature velvet texture.
- Perfect for Special Occasions: Whether you’re hosting a black-tie party, a monochrome-themed event, or just want to impress with unique treats, these cookies deliver.
- Crowd-Pleaser: The rich cocoa flavor paired with smooth royal icing is a hit with kids and adults alike — I’ve never had leftovers!
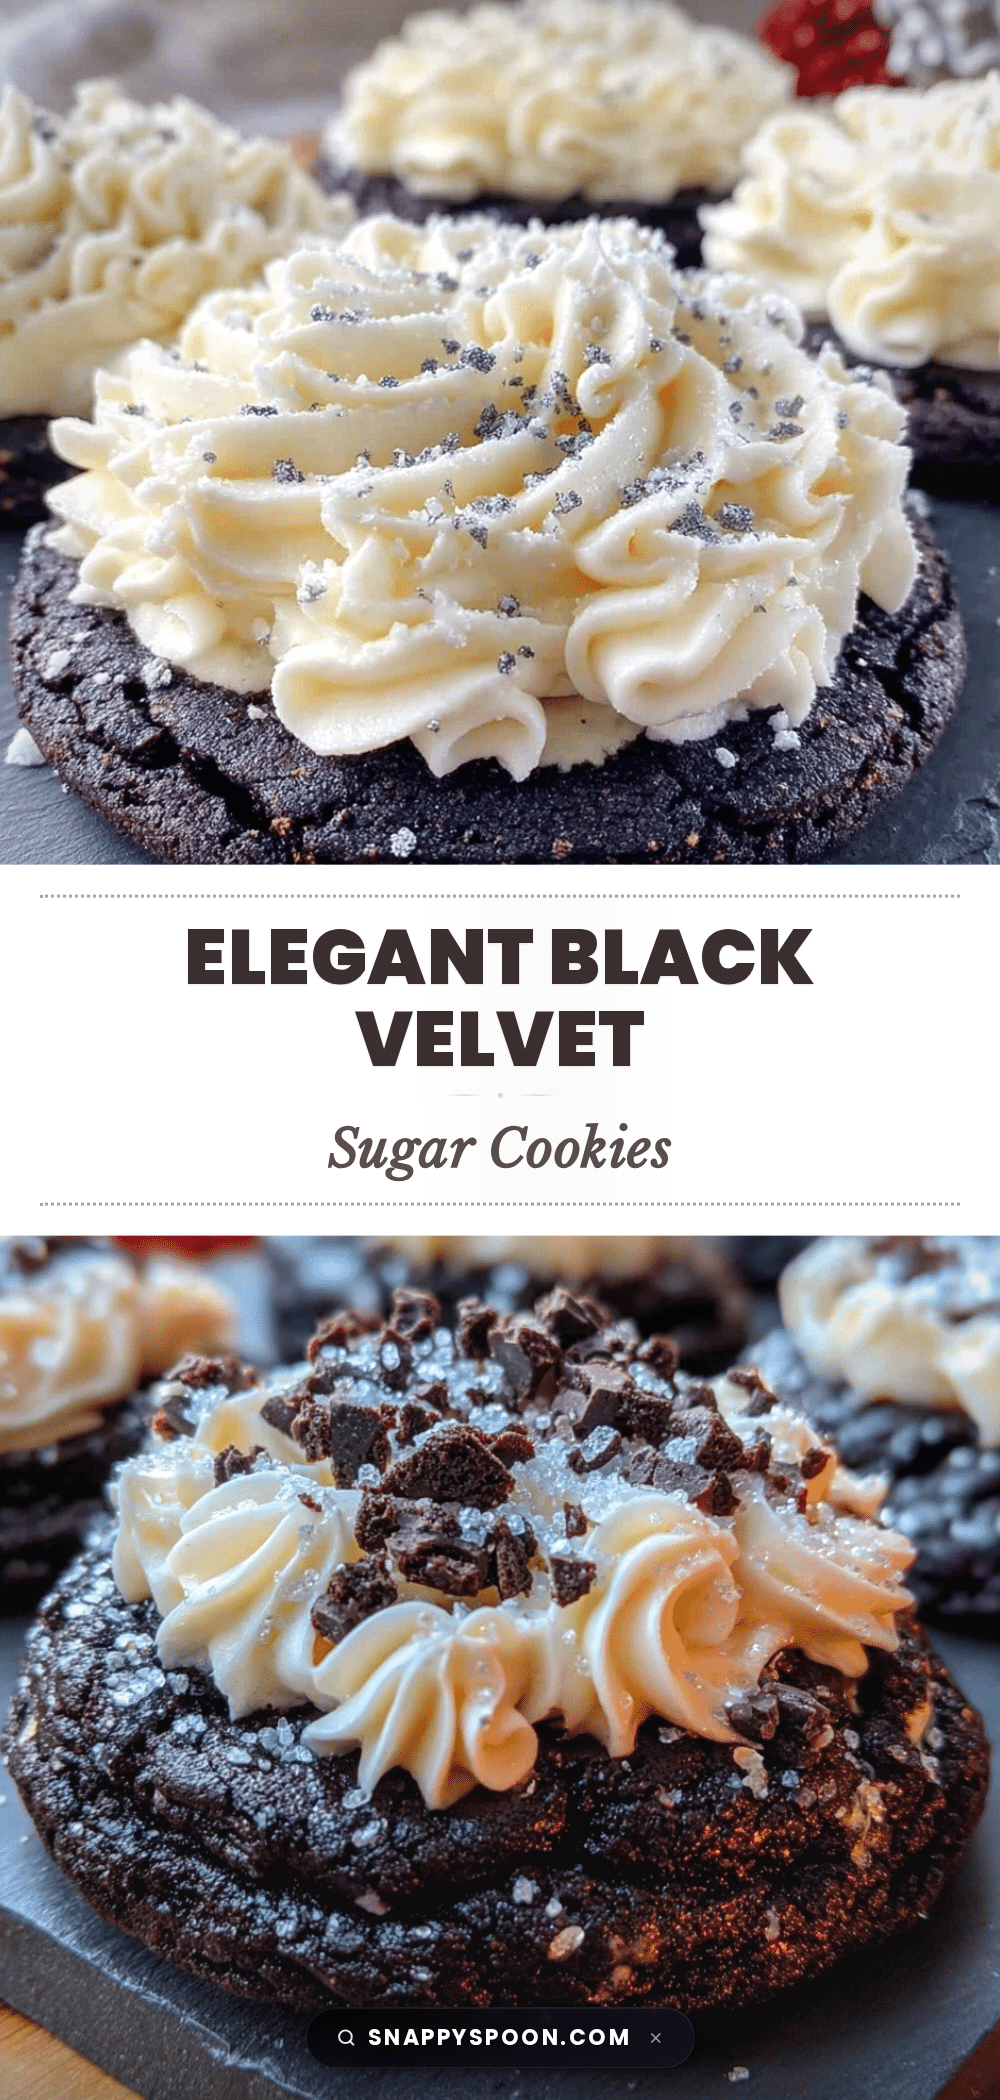
- Unbelievably Delicious: The black velvet dough is soft and tender, while the royal icing dries to a delicate matte finish, creating that authentic chalkboard look.
What sets this recipe apart is the technique of using Dutch-processed cocoa powder for a deeper color and flavor, combined with a touch of black gel food coloring to achieve a flawless black velvet hue. Plus, the royal icing is crafted for just the right consistency to pipe fine details or flood the cookie surface without cracking.
This isn’t just another decorated sugar cookie — it’s the kind of recipe that makes you pause and appreciate the artistry, while still craving the next bite. Perfect for impressing guests without the fuss, or turning a simple cookie exchange into a memorable affair.
What Ingredients You Will Need
This recipe uses straightforward, wholesome ingredients that come together to create bold flavor and a stunning look without complicated steps. Most of these are pantry staples, and substitutions are easy if needed.
- For the Black Velvet Sugar Cookies:
- 2 ¾ cups (345g) all-purpose flour, sifted
- ¾ cup (75g) Dutch-processed cocoa powder (for deep color and richness)
- 1 teaspoon baking soda
- ½ teaspoon salt
- 1 cup (226g) unsalted butter, softened (I prefer Plugrá for a silky texture)
- 1 ¼ cups (250g) granulated sugar
- 2 large eggs, room temperature
- 2 teaspoons pure vanilla extract
- 1 teaspoon apple cider vinegar (helps to tenderize and enhance color)
- 1 teaspoon black gel food coloring (AmeriColor or Wilton are reliable brands)
- For the Royal Icing:
- 3 cups (360g) powdered sugar, sifted
- 2 large egg whites or 4 tablespoons meringue powder + 5 tablespoons water (for safety and convenience)
- 1 teaspoon lemon juice or vanilla extract (for flavor)
- Black gel food coloring (to achieve that chalkboard black)
- Optional: 1 teaspoon corn syrup (adds shine and flexibility)
Feel free to swap all-purpose flour for a gluten-free blend if needed. For dairy-free cookies, use plant-based butter substitutes like Earth Balance. If you prefer avoiding raw egg whites in royal icing, meringue powder is a safe and effective replacement.
In summer, I sometimes add a hint of espresso powder to the dough for an even richer cocoa flavor, but it’s absolutely optional. When it comes to decorating, gel food coloring is a must for that intense black color without thinning the icing.
Equipment Needed
- Stand mixer or hand mixer: Essential for creaming butter and whipping royal icing smoothly. I use a KitchenAid Artisan, but a good hand mixer works too.
- Mixing bowls: Multiple sizes, preferably glass or stainless steel to avoid staining from black food coloring.
- Rubber spatulas and wooden spoons: For folding and scraping the batter and icing.
- Rolling pin: A smooth wooden or acrylic rolling pin helps get an even thickness on the dough.
- Cookie cutters: Round or plaque-shaped cutters are perfect for this design. I like a 3-inch diameter for ideal decorating space.
- Baking sheets and parchment paper or silicone mats: To prevent sticking and promote even baking.
- Piping bags and various tips: Small round tips (size #1 or #2) for fine lines, and larger tips (#3 or #4) for flooding. Disposable bags are convenient for color changes.
- Sifter: For powdered sugar and cocoa powder to keep the batter and icing lump-free.
If you’re on a budget, silicone mats can be swapped for parchment paper, and small zip-top bags can substitute piping bags in a pinch. Just snip the corner for icing piping.
Maintenance tip: Clean your mixing bowls immediately after working with black food coloring to avoid stubborn stains. I keep a dedicated bowl for royal icing because it’s so tricky to clean once dried.
Preparation Method
- Preheat your oven to 350°F (175°C). Line baking sheets with parchment paper or silicone mats. This step takes about 10 minutes but gets things ready for smooth baking.
- Mix dry ingredients: In a medium bowl, sift together 2 ¾ cups all-purpose flour, ¾ cup Dutch-processed cocoa powder, 1 teaspoon baking soda, and ½ teaspoon salt. Set aside. This ensures no lumps and even distribution of cocoa and leavening.
- Cream butter and sugar: In a large bowl, beat 1 cup softened unsalted butter with 1 ¼ cups granulated sugar until light and fluffy, about 3-4 minutes. The texture should be pale and airy; this is key for tender cookies.
- Add eggs and flavor: Beat in 2 large eggs one at a time, then mix in 2 teaspoons vanilla extract and 1 teaspoon apple cider vinegar. The vinegar boosts tenderness and helps the cocoa stay vibrant.
- Incorporate black gel food coloring: Add 1 teaspoon black gel food coloring to the wet mixture. Mix until the color is uniform. Don’t worry if it looks very dark — that’s the charm of black velvet!
- Combine wet and dry ingredients: Gradually add the dry ingredients to the wet bowl, mixing on low speed just until combined. Avoid overmixing to keep cookies soft. The dough will be slightly sticky but manageable.
- Chill the dough: Wrap the dough in plastic wrap and refrigerate for at least 1 hour. This step helps with rolling and keeps cookies from spreading too much during baking.
- Roll and cut cookies: On a lightly floured surface, roll the dough out to about ¼ inch (6 mm) thickness. Use your cookie cutters to cut shapes and place them about 1 inch (2.5 cm) apart on the baking sheets.
- Bake: Bake cookies for 9-11 minutes, rotating the pans halfway through. Cookies will look set but slightly soft in the center. Let them cool completely on wire racks before decorating.
- Prepare royal icing: In a clean bowl, beat 3 cups powdered sugar with 2 large egg whites (or meringue powder and water) and 1 teaspoon lemon juice until stiff peaks form, about 7-10 minutes. Add black gel food coloring a drop at a time until desired chalkboard black is reached. Adjust consistency with small water amounts for piping or flooding.
- Decorate cookies: Use piping bags to outline and flood each cookie. Let the base layer dry for at least 1 hour. Then pipe chalk-like details using a stiffer icing consistency. Let decorated cookies dry fully, ideally overnight.
Pro tip: If your dough warms up while rolling, pop it back into the fridge for 10 minutes. Also, when flooding, use a toothpick to spread icing gently and eliminate air bubbles. Trust me, these small touches make a big difference.
Cooking Tips & Techniques
Making these elegant chalkboard black velvet sugar cookies with royal icing can feel like an art project, but a few insider tips help keep you on track:
- Use Dutch-processed cocoa powder: It’s less acidic and darker than natural cocoa, perfect for that deep black velvet color and smooth flavor.
- Gel food coloring over liquid: Liquid colors thin the dough and icing, so gel or paste types give you intense color without changing texture.
- Chill your dough: Always chill before rolling to prevent spreading and keep edges sharp. I sometimes chill cut cookies on the sheet before baking for extra crisp lines.
- Royal icing consistency matters: Thin icing is for flooding, thick icing is for detailing. Start thicker, and add water dropwise to reach flooding texture.
- Practice piping on parchment: Before decorating cookies, test your icing flow to avoid shaky lines or blobs.
- Avoid humidity: Royal icing dries best in a cool, dry environment. If it’s humid, consider using a fan nearby to speed drying.
- Common mistake — overmixing dough: Mix just until ingredients combine to keep cookies tender, not tough.
- Multitasking tip: While cookies bake, prepare your royal icing so you can dive straight into decorating once cooled.
Once, I accidentally used regular cocoa powder and ended up with a reddish-brown dough — not what I wanted! Lesson learned: Dutch-process cocoa is key. Also, don’t rush drying times; letting royal icing cure overnight prevents cracks and smudges.
Variations & Adaptations
You can customize these chalkboard black velvet sugar cookies in plenty of ways to suit your preferences or dietary needs:
- Dietary: Swap all-purpose flour with a gluten-free blend for allergy-friendly cookies. Use dairy-free butter and coconut yogurt to keep it vegan.
- Seasonal: Add a pinch of cinnamon or pumpkin spice in fall for warmth. In spring, swap black food coloring with deep navy for a midnight blue twist.
- Flavor: Mix espresso powder into the dough for mocha notes or a drop of almond extract for a subtle nutty flavor.
- Decorating style: Instead of chalkboard art, try metallic accents with edible gold dust or pastel royal icing for a softer look.
- Cooking method: For a crispier edge, bake 1-2 minutes longer; for softer centers, pull them out a bit earlier.
Personally, I once swapped the black icing for white and piped delicate lace patterns for a wedding shower — same dough, totally different vibe. Feel free to experiment with piping techniques or color palettes to match your event.
Serving & Storage Suggestions
These elegant chalkboard black velvet sugar cookies are best enjoyed at room temperature. I like to serve them on a simple white platter so the black and white contrast pops visually. They pair wonderfully with a cup of Earl Grey tea or a rich dark coffee to balance the sweetness.
Store cookies in an airtight container at room temperature for up to 5 days. If you want to keep them longer, place them in a single layer wrapped tightly in plastic wrap, then freeze for up to 3 months. When ready to enjoy, thaw at room temperature for a few hours.
Reheating isn’t necessary, but if you prefer a slightly soft cookie, pop them in a 300°F (150°C) oven for 5 minutes. Just be careful not to melt the royal icing decorations.
Side note: the flavor and texture of these cookies mellow beautifully after a day, so if you can wait, decorating the day before your event is a smart move.
Nutritional Information & Benefits
Each cookie (based on a 3-inch diameter) contains approximately:
| Calories | 150 kcal |
|---|---|
| Fat | 7g |
| Carbohydrates | 22g |
| Protein | 2g |
| Sugar | 14g |
Key ingredients like Dutch-processed cocoa offer antioxidants and a richer flavor than standard cocoa powder. Using real butter provides healthy fats and a better texture compared to margarine. While these cookies are indulgent treats, they don’t include artificial preservatives or fillers.
If you have egg allergies, consider using pasteurized meringue powder in the royal icing and an egg substitute in the dough. The recipe is naturally gluten-rich, but easy to adapt with gluten-free flour blends for those with sensitivities.
From a wellness point of view, I appreciate that this recipe balances flavor and elegance without relying on over-the-top sugar levels or artificial additives. It’s the kind of treat you feel good sharing at gatherings.
Conclusion
These elegant chalkboard black velvet sugar cookies with royal icing are a delightful way to impress without stress. The contrast between deep black velvet dough and crisp white or black royal icing decorations creates a sophisticated look that’s perfect for any special occasion or just a fancy weekend treat.
I love this recipe because it combines drama and simplicity — it’s as fun to make as it is to eat. Plus, it’s flexible enough to suit all kinds of events and personal tastes. Honestly, every time I pull these cookies out, friends ask for the recipe, then come back for more.
Give these cookies a try, play with the decorations, and make them your own. I’d love to hear how your chalkboard cookies turn out — leave a comment or share your photos so we can celebrate your baking wins together!
FAQs About Elegant Chalkboard Black Velvet Sugar Cookies
- Can I make the cookie dough ahead of time? Yes! The dough can be refrigerated for up to 3 days or frozen for up to 1 month. Just thaw and roll as usual.
- What if I don’t have black gel food coloring? You can use a mix of cocoa powder and a small amount of blue and red gels to approximate black, but true black gel coloring is best for that deep velvet look.
- How do I fix royal icing that’s too thick? Add a few drops of water at a time and mix thoroughly until you reach the desired piping or flooding consistency.
- Are these cookies suitable for children? Yes, but if using raw egg whites in royal icing, consider pasteurized meringue powder for safety.
- Can I store decorated cookies longer than 5 days? It’s best to freeze them after decorating if you want to keep them longer. Wrap well and thaw at room temperature before serving.
Pin This Recipe!
Elegant Chalkboard Black Velvet Sugar Cookies
Soft, tender black velvet sugar cookies with a deep cocoa flavor, decorated with smooth, matte royal icing that resembles chalkboard art. Perfect for special occasions or elegant treats.
- Prep Time: 20 minutes
- Cook Time: 11 minutes
- Total Time: 1 hour 45 minutes
- Yield: 24 cookies (3-inch diameter) 1x
- Category: Dessert
- Cuisine: American
Ingredients
- 2 ¾ cups (345g) all-purpose flour, sifted
- ¾ cup (75g) Dutch-processed cocoa powder
- 1 teaspoon baking soda
- ½ teaspoon salt
- 1 cup (226g) unsalted butter, softened
- 1 ¼ cups (250g) granulated sugar
- 2 large eggs, room temperature
- 2 teaspoons pure vanilla extract
- 1 teaspoon apple cider vinegar
- 1 teaspoon black gel food coloring
- 3 cups (360g) powdered sugar, sifted
- 2 large egg whites or 4 tablespoons meringue powder + 5 tablespoons water
- 1 teaspoon lemon juice or vanilla extract
- Black gel food coloring (for icing)
- Optional: 1 teaspoon corn syrup
Instructions
- Preheat oven to 350°F (175°C). Line baking sheets with parchment paper or silicone mats.
- In a medium bowl, sift together flour, Dutch-processed cocoa powder, baking soda, and salt. Set aside.
- In a large bowl, beat softened butter and granulated sugar until light and fluffy, about 3-4 minutes.
- Beat in eggs one at a time, then mix in vanilla extract and apple cider vinegar.
- Add black gel food coloring to the wet mixture and mix until uniform in color.
- Gradually add dry ingredients to wet ingredients, mixing on low speed just until combined.
- Wrap dough in plastic wrap and refrigerate for at least 1 hour.
- Roll dough on a lightly floured surface to ¼ inch (6 mm) thickness. Cut shapes with cookie cutters and place 1 inch apart on baking sheets.
- Bake for 9-11 minutes, rotating pans halfway through. Let cookies cool completely on wire racks.
- Prepare royal icing by beating powdered sugar with egg whites (or meringue powder and water) and lemon juice until stiff peaks form, about 7-10 minutes.
- Add black gel food coloring a drop at a time until desired chalkboard black is reached. Adjust consistency with water for piping or flooding.
- Outline and flood each cookie with royal icing. Let base layer dry for at least 1 hour.
- Pipe chalk-like details with stiffer icing consistency. Let decorated cookies dry fully, ideally overnight.
Notes
Use Dutch-processed cocoa powder for deeper color and flavor. Gel food coloring is preferred over liquid to avoid thinning dough and icing. Chill dough before rolling to prevent spreading. Practice piping on parchment paper before decorating. Let royal icing dry overnight to prevent cracks. Dough can be refrigerated up to 3 days or frozen for 1 month. For dairy-free, use plant-based butter substitutes. For egg allergies, use meringue powder and egg substitutes.
Nutrition
- Serving Size: 1 cookie (3-inch dia
- Calories: 150
- Sugar: 14
- Fat: 7
- Carbohydrates: 22
- Protein: 2
Keywords: black velvet sugar cookies, chalkboard cookies, royal icing, decorated sugar cookies, elegant cookies, black cocoa cookies