Love this? Save it for later!
Share the inspiration with your friends
It was supposed to be a simple loaf of sourdough. That was the plan, anyway. I had my starter bubbling away happily on the counter, my flour measured, and a whole Sunday afternoon stretching out in front of me. But then my kid decided today was the day to learn how to whistle—loudly, right next to my ear—and I grabbed the wrong container. Instead of my active starter, I grabbed the jar of discard sitting in the back of the fridge. You know, the stuff you usually feel a little guilty about tossing. I was already running late for a playdate, the kitchen was a mess, and I was this close to just ordering pizza. What came out of the oven that day was nothing like my original plan. It was better. So much better. This cheesy, garlicky, herb-flecked focaccia was born from a mistake and a moment of “well, let’s just see what happens.” Honestly, I think that’s where the best recipes come from.
The first time I made this easy cheesy garlic sourdough discard focaccia, I pulled it out of the oven and just stared at it. The top was golden and bubbly, the cheese was melted into little crispy edges, and the smell of garlic and rosemary filled the whole house. I mean, my neighbor actually texted me to ask what I was baking. I didn’t even have a plan for it—I just tore off a piece while it was still warm, and that first bite was pure, buttery, garlicky heaven. The texture was incredible, too. The discard gave it this tangy depth that regular focaccia just doesn’t have, and the crumb was so light and airy I couldn’t believe it came from a “mistake.” Maybe you’ve been there—staring at a jar of discard and wondering what on earth to do with it. This recipe is the answer. It’s the kind of bread that makes you look like a hero with almost no effort, and it’s been on repeat in my kitchen ever since that chaotic Sunday.
Why You’ll Love This Recipe
Let me tell you, I have tested a lot of focaccia recipes. Some were too dense, some were too oily, and some just didn’t have that wow factor. This one? It’s different. It’s the kind of bread that makes you close your eyes after the first bite. I’ve brought it to potlucks, served it alongside pasta, and even eaten a whole half-pan by myself for dinner (no regrets). Here’s why I think you’ll love it just as much.
- Quick & Easy: This comes together in about 2 hours from start to finish, with most of that time being hands-off rising. It’s perfect for a lazy weekend afternoon or a last-minute side dish for dinner.
- Simple Ingredients: You probably already have everything in your pantry and fridge. No fancy grocery trips needed—just flour, discard, olive oil, garlic, and cheese.
- Perfect for Using Up Discard: If you keep a sourdough starter, you know the struggle. This is the ultimate discard recipe—it uses a full cup, so you can finally clear out that jar in the fridge.
- Crowd-Pleaser: I’ve served this to kids, adults, and picky eaters, and it always gets rave reviews. The cheesy, garlicky top is basically irresistible.
- Unbelievably Delicious: The texture is light and airy with a crispy, golden crust. The combination of tangy sourdough, savory garlic, and melted cheese is next-level comfort food.
What makes this recipe different from the rest is the technique. Instead of a complicated stretch-and-fold routine, I use a simple, no-knead method that builds structure over time. The discard adds a subtle tang and helps create that beautiful, open crumb without any extra yeast. It’s not just another focaccia recipe—it’s my best version, tested and tweaked until it was absolutely perfect. And honestly? It’s the one I come back to every single time I have discard to use up.
What Ingredients You Will Need
This recipe uses simple, wholesome ingredients to deliver bold flavor and satisfying texture without the fuss. Most of these are pantry staples, and the rest are easy to find at any grocery store. Let’s break down what you’ll need and why each ingredient matters.
- All-Purpose Flour: 3 cups (360g). This is the backbone of the focaccia. I prefer unbleached all-purpose flour for the best texture, but bread flour works too if you want a slightly chewier crumb. Don’t use whole wheat flour unless you’re mixing it with all-purpose, or the focaccia will be too dense.
- Sourdough Discard: 1 cup (240g), unfed and straight from the fridge. This is the star of the show. The discard adds a tangy flavor and helps with the rise, even if it’s not bubbly. I usually use discard that’s been sitting in the fridge for up to a week—older discard actually has a more pronounced sour flavor, which I love.
- Warm Water: 1 cup (240ml). The water should be lukewarm, about 100°F (38°C). Too hot and it can kill the natural yeast in the discard; too cold and the dough won’t rise properly. I just run my tap until it feels like a warm bath.
- Olive Oil: ¼ cup (60ml) for the dough, plus extra for the pan and drizzling. Use a good-quality extra virgin olive oil here—it adds flavor and helps create that crispy, golden crust. I like California Olive Ranch for everyday baking.
- Salt: 1½ teaspoons. I use fine sea salt. If you’re using kosher salt, you might need a bit more. Salt is crucial for flavor and also helps strengthen the gluten structure.
- Instant Yeast: 1 teaspoon (optional, for a faster rise). I usually skip this if I’m using discard that’s less than a week old, but if your discard is older or you’re short on time, a little yeast helps ensure a good rise. It’s a safety net, not a requirement.
- Garlic: 4-5 cloves, minced. Fresh garlic is non-negotiable here. The pre-minced stuff in a jar just doesn’t have the same punch. I like to let the minced garlic sit in a little olive oil while the dough rises—it mellows the sharpness and infuses the oil.
- Shredded Mozzarella Cheese: 1 cup (about 100g). Low-moisture mozzarella works best here—it melts beautifully and gets those crispy, browned edges. Fresh mozzarella is too wet and can make the focaccia soggy.
- Parmesan Cheese: ¼ cup (25g), grated. This adds a salty, nutty flavor that complements the mozzarella perfectly. I like to use real Parmigiano-Reggiano for the best flavor, but a good domestic Parmesan works too.
- Fresh Rosemary: 2 tablespoons, chopped. Rosemary and garlic are a classic pairing, and the herbaceous flavor cuts through the richness of the cheese. Dried rosemary works in a pinch, but use half the amount since it’s more concentrated.
- Flaky Sea Salt: For finishing. A sprinkle of Maldon sea salt right before baking adds a lovely crunch and a burst of salty flavor. It’s a small detail that makes a big difference.
Equipment Needed
You don’t need a lot of fancy equipment to make this focaccia. I’ve made it in all sorts of pans and with all sorts of tools, and it always turns out great. Here’s what you’ll need.
- 9×13-inch Baking Pan: This is the ideal size for this recipe. A metal pan gives you the crispiest bottom crust, but a glass or ceramic dish works too—just keep an eye on the baking time, as glass can take a little longer. I actually prefer a dark-colored metal pan for the best browning.
- Large Mixing Bowl: Any bowl will do, but I like using a wide, shallow bowl for mixing the dough. It makes it easier to incorporate all the ingredients without making a mess.
- Wooden Spoon or Dough Whisk: A sturdy spoon is all you need for mixing. I have a Danish dough whisk that I love, but a regular wooden spoon works just fine.
- Plastic Wrap or a Clean Kitchen Towel: For covering the dough while it rises. I prefer a damp kitchen towel because it’s reusable and keeps the dough from drying out.
- Measuring Cups and Spoons: Accurate measurements are important for baking. I always use the spoon-and-level method for flour to avoid packing it down.
- Kitchen Scale (Optional but Recommended): Weighing your ingredients is the most accurate way to bake, especially with sourdough. I use a simple digital scale, and it’s made a huge difference in my consistency.
If you don’t have a 9×13 pan, you can use a 10-inch cast iron skillet or even a round cake pan. The focaccia will just be thicker or thinner depending on the pan size. I’ve also used a disposable aluminum pan when I was traveling, and it worked surprisingly well. Just don’t use a nonstick pan without some extra oil—the dough can be sticky.
Preparation Method
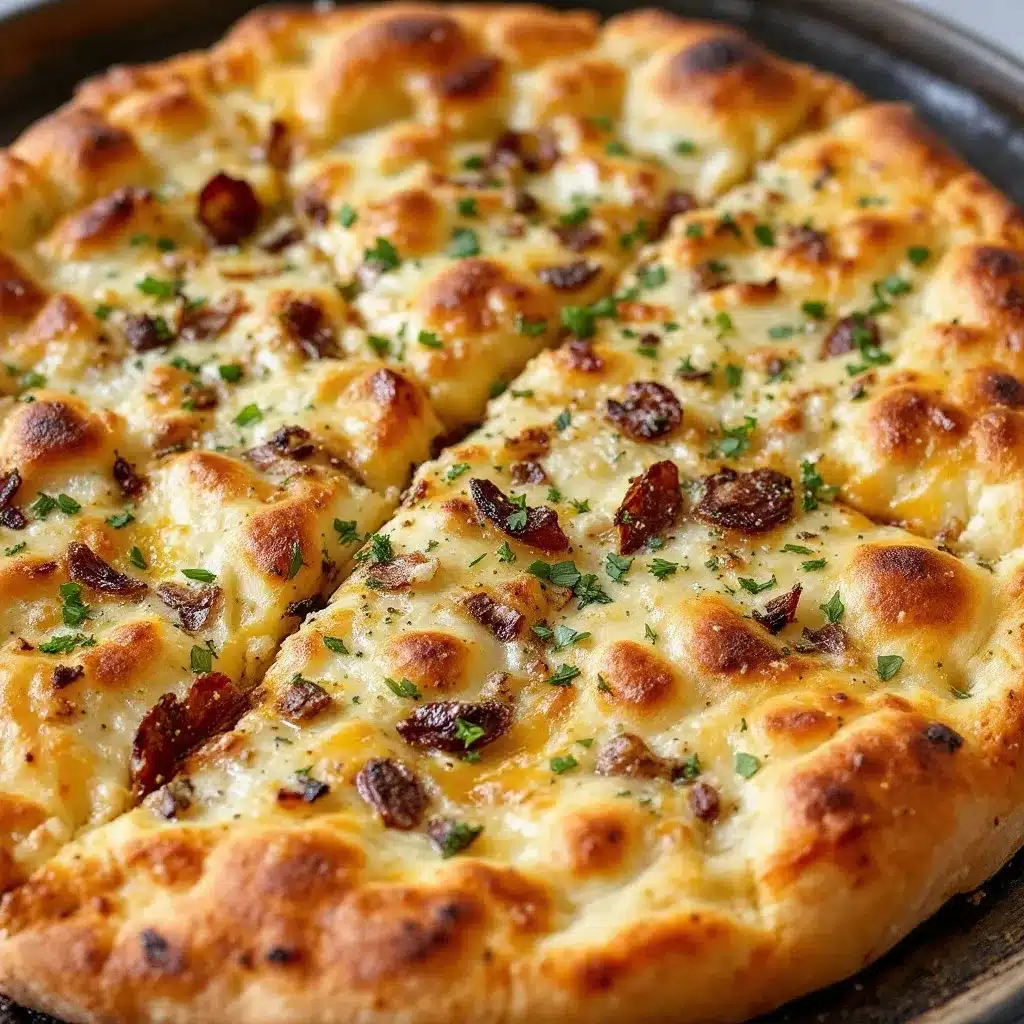
This is the fun part. The method is simple, but there are a few key steps that make all the difference. I’ve included time estimates and sensory cues to help you know exactly what to look for at each stage.
- Mix the Dough (5 minutes): In a large mixing bowl, combine 3 cups (360g) all-purpose flour, 1½ teaspoons salt, and 1 teaspoon instant yeast (if using). Whisk together. Add 1 cup (240g) sourdough discard, 1 cup (240ml) warm water, and ¼ cup (60ml) olive oil. Stir with a wooden spoon until a shaggy, sticky dough forms. It will look rough and lumpy—that’s exactly what you want. Don’t overmix. Cover the bowl with plastic wrap or a damp towel and let it rest for 30 minutes. This autolyse step helps the flour absorb the liquid and makes the dough easier to work with later.
- Stretch and Fold (30 minutes, hands-on time about 2 minutes): After the rest, wet your hands with a little water to prevent sticking. Grab one side of the dough, stretch it up, and fold it over the top. Rotate the bowl a quarter turn and repeat, doing a total of 4 stretches and folds. This builds strength in the dough without kneading. Cover and let rest for another 30 minutes. Repeat the stretch and fold process one more time. The dough should feel smoother and more elastic after the second round.
- First Rise (1 to 1.5 hours): Cover the bowl and let the dough rise at room temperature until it’s doubled in size and bubbly on top. This usually takes about 1 to 1.5 hours, depending on the temperature of your kitchen. If your discard is very active, it might be faster. The dough should look puffy and have a few visible bubbles on the surface. If it doesn’t look doubled after 1.5 hours, give it another 30 minutes. Patience is key here.
- Prepare the Pan and Second Rise (30 minutes): Pour about 2 tablespoons of olive oil into your 9×13-inch baking pan and spread it around to coat the bottom and sides. Gently transfer the dough to the pan—don’t deflate it too much. Let the dough rest for 10 minutes, then gently stretch it to the edges of the pan. If it springs back, let it rest another 10 minutes and try again. Cover and let rise for another 30 minutes. The dough should be puffy and fill the pan.
- Dimple and Top (10 minutes): Preheat your oven to 425°F (220°C). Drizzle another tablespoon of olive oil over the dough. Using your fingertips, press deep dimples all over the surface of the dough—go all the way down to the bottom of the pan. This is what gives focaccia its signature texture. In a small bowl, mix the minced garlic with a tablespoon of olive oil. Spoon the garlic mixture over the dough, spreading it evenly. Sprinkle the shredded mozzarella and grated Parmesan over the top, followed by the chopped rosemary and a generous pinch of flaky sea salt.
- Bake (20-25 minutes): Place the pan in the preheated oven and bake for 20-25 minutes, until the top is golden brown and the cheese is bubbly and starting to brown in spots. Rotate the pan halfway through for even baking. The focaccia should sound hollow when you tap it on the bottom. If the top is browning too quickly but the bottom isn’t done, tent the pan with foil for the last 5 minutes.
- Cool and Serve (10 minutes): Remove the focaccia from the oven and let it cool in the pan for 5 minutes. Then transfer it to a wire rack. This prevents the bottom from getting soggy. Let it cool for at least 10 minutes before slicing—I know it’s hard to wait, but it’s worth it. The cheese will set slightly and the texture will be perfect. Serve warm or at room temperature.
Cooking Tips & Techniques
I’ve made this focaccia more times than I can count, and I’ve learned a few things along the way. Some of these tips came from happy accidents, and others came from total disasters. Here’s what I wish I knew from the start.
Don’t Skip the Stretch and Fold: I know it seems like an extra step, but it’s crucial for developing gluten without kneading. The first time I made this, I skipped it because I was in a hurry, and the focaccia came out dense and flat. The stretch and fold creates that light, airy crumb you’re looking for. It only takes a few minutes, and it makes all the difference.
Use Room Temperature Discard: If you have time, take your discard out of the fridge about an hour before you start mixing. Cold discard can slow down the rise. I’ve used it straight from the fridge in a pinch, and it worked fine—it just took a little longer to rise. If you’re in a hurry, use warm water (around 110°F) to help wake things up.
Watch Your Oven: Every oven is different, and I’ve burned the bottom of this focaccia more than once. If your oven runs hot, check the focaccia at 18 minutes. If the top is golden but the bottom is getting too dark, move the pan to a higher rack or place a baking sheet on the rack below to diffuse the heat. I learned this the hard way after a particularly sad batch.
Let It Cool: I know it’s tempting to tear into it right away, but letting it cool for at least 10 minutes is important. The steam inside needs to redistribute, and the cheese needs to set. If you slice it too soon, the texture will be gummy. Trust me on this one—I’ve made that mistake more than once.
Multitask Wisely: The great thing about this recipe is that most of the time is hands-off. I like to start the dough in the morning, then go about my day while it rises. I’ll do the stretch and folds while I’m waiting for my coffee to brew, and I’ll dimple and top it while I’m prepping dinner. It’s a very forgiving recipe that fits into your schedule, not the other way around.
Variations & Adaptations
This recipe is incredibly versatile, and I’ve tried all sorts of variations over the years. Some were hits, some were misses, but all of them were fun to experiment with. Here are a few of my favorites.
Herb and Garlic Butter Swirl: Instead of topping the focaccia with garlic and oil, melt 3 tablespoons of butter with the minced garlic and brush it over the dough before baking. Sprinkle with fresh thyme and oregano. The butter adds a richness that’s absolutely divine. I did this for a dinner party once, and everyone asked for the recipe.
Everything Bagel Focaccia: Skip the cheese and rosemary, and instead sprinkle the top with everything bagel seasoning before baking. The sesame seeds, poppy seeds, garlic, and onion flakes get toasty and crunchy. This version is amazing with cream cheese or as a side for soup. I’ve been making it nonstop this winter.
Sun-Dried Tomato and Feta: Add ½ cup of chopped sun-dried tomatoes (drained of oil) and ½ cup of crumbled feta cheese along with the mozzarella. The sun-dried tomatoes add a sweet, tangy burst, and the feta gives it a salty, briny kick. This is my go-to for summer potlucks—it pairs perfectly with grilled meats and fresh salads.
Gluten-Free Option: I’ve tested this with a gluten-free all-purpose flour blend (the one with xanthan gum), and it worked surprisingly well. The texture is a little more delicate, so be gentle when stretching the dough. Add an extra tablespoon of olive oil to keep it moist. It’s not exactly the same as the original, but it’s still delicious and satisfies that focaccia craving.
Vegan Version: Use vegan mozzarella and Parmesan shreds, or skip the cheese altogether and double up on the garlic and herbs. Nutritional yeast sprinkled on top adds a cheesy flavor without the dairy. I made this for a vegan friend, and she said it was the best bread she’d had in months.
Serving & Storage Suggestions
This focaccia is best served warm, right out of the oven, when the cheese is still melty and the crust is perfectly crispy. But honestly, it’s pretty amazing at room temperature too. I’ve been known to eat it for breakfast the next day, slightly toasted and slathered with butter.
Serving Temperature: Serve warm or at room temperature. If you’re making it ahead, reheat it in a 350°F oven for 5-10 minutes to crisp up the crust. Avoid the microwave—it’ll make the focaccia soggy and the cheese rubbery.
Complementary Dishes: This focaccia is incredibly versatile. Serve it alongside a bowl of tomato soup or minestrone for a cozy meal. It’s also perfect with pasta dishes, like spaghetti aglio e olio or a hearty bolognese. For a lighter option, pair it with a big green salad and some grilled chicken. And honestly, it’s amazing just on its own as a snack.
Storage Instructions: Store leftover focaccia in an airtight container at room temperature for up to 2 days. I like to line the container with a paper towel to absorb any excess moisture. For longer storage, wrap it tightly in plastic wrap and then foil, and freeze for up to 3 months. To serve, thaw at room temperature and reheat in the oven.
Reheating Methods: The best way to reheat focaccia is in a 350°F oven for 5-7 minutes. If you’re in a hurry, you can use a toaster oven or even an air fryer at 350°F for 3-4 minutes. The goal is to get the crust crispy again without drying out the interior. I’ve also had success reheating it in a skillet over medium heat for a few minutes per side.
Flavor Development: The flavors actually get better after a day or two. The garlic mellows and melds with the cheese, and the rosemary infuses the whole bread. I’ve found that the focaccia is even more flavorful on day two, especially if you toast it. It’s one of those rare recipes that’s just as good the next day.
Nutritional Information & Benefits
I’m not a nutritionist, but I do like to know what’s in my food. Here’s a rough breakdown for one serving (about 1/8 of the recipe). Keep in mind that these are estimates and can vary based on the specific ingredients you use.
Estimated Nutritional Values (per serving):
- Calories: 280
- Fat: 14g
- Carbohydrates: 32g
- Protein: 8g
- Fiber: 1g
- Sugar: 1g
Health Benefits: Sourdough discard has a few surprising health benefits. The fermentation process breaks down some of the phytic acid in the flour, which can make the nutrients more bioavailable. It also has a lower glycemic index compared to regular bread, meaning it won’t spike your blood sugar as much. Plus, the olive oil is full of healthy monounsaturated fats, and the garlic is known for its immune-boosting properties. So yes, you can feel a little bit virtuous while eating this cheesy, garlicky bread.
Dietary Considerations: This recipe is vegetarian. It contains gluten and dairy, but I’ve included gluten-free and vegan variations above. If you’re watching your sodium, you can reduce the salt in the dough and skip the flaky sea salt on top. The cheese adds plenty of saltiness on its own.
Potential Allergens: Wheat (gluten), dairy (cheese). If you have allergies, please check your specific ingredients and use appropriate substitutions.
Conclusion
This easy cheesy garlic sourdough discard focaccia is one of those recipes that feels like a secret weapon. It turns a humble jar of discard into something absolutely spectacular, and it does it with minimal effort and maximum flavor. I’ve made it for casual weeknight dinners, holiday gatherings, and everything in between, and it never fails to impress. The best part? It’s completely forgiving. Whether you’re a seasoned sourdough baker or a total beginner, this recipe works. It’s designed to fit into your life, not the other way around.
I’d love to hear how it turns out for you. Did you try a variation? Did you add extra cheese (I won’t judge)? Drop a comment below and let me know. And if you loved it, share it with a friend who needs a good discard recipe. Honestly, this bread is too good to keep to yourself. Happy baking, friend—you’ve got this.
Frequently Asked Questions
Can I use active sourdough starter instead of discard?
Yes, absolutely. If you use active starter, you might need to reduce the water slightly since active starter is usually thinner than discard. The focaccia will also rise faster, so keep an eye on it. I’ve done it both ways, and it works great either way.
My dough seems very sticky. Is that normal?
Yes, focaccia dough is supposed to be sticky. It’s a high-hydration dough, which is what gives it that light, airy texture. Resist the urge to add more flour—it will make the bread dense. Use wet hands or a little olive oil on your fingers to handle it.
Can I make this without instant yeast?
Definitely. The sourdough discard provides plenty of natural yeast for leavening. Without the instant yeast, the rise will take longer—about 2 to 3 hours for the first rise instead of 1 to 1.5 hours. Just be patient and let the dough tell you when it’s ready.
Why didn’t my focaccia get those big bubbles?
There are a few possible reasons. The dough might not have risen enough, or you might have deflated it too much when transferring it to the pan. Also, make sure you’re using enough olive oil in the pan—the oil helps create that crispy, bubbly bottom. Next time, try letting it rise a little longer and be gentler when handling the dough.
Can I freeze the unbaked dough?
Yes, you can. After the first rise, punch it down, shape it into a ball, wrap it tightly in plastic wrap, and freeze for up to a month. When you’re ready to bake, thaw it in the refrigerator overnight, then proceed with the second rise in the pan. It might take a little longer to rise after thawing, but it works beautifully.
Pin This Recipe!

Easy Cheesy Garlic Sourdough Discard Focaccia, Best Ever

This cheesy, garlicky, herb-flecked focaccia is born from a mistake and a moment of ‘well, let’s just see what happens.’ It turns a humble jar of sourdough discard into something absolutely spectacular with minimal effort and maximum flavor.
- Prep Time: 15 minutes
- Cook Time: 25 minutes
- Total Time: 2 hours
- Yield: 8 servings 1x
- Category: Bread
- Cuisine: Italian
Ingredients
- 3 cups (360g) all-purpose flour
- 1 cup (240g) sourdough discard, unfed and straight from the fridge
- 1 cup (240ml) warm water (about 100°F / 38°C)
- ¼ cup (60ml) olive oil, plus extra for the pan and drizzling
- 1½ teaspoons fine sea salt
- 1 teaspoon instant yeast (optional, for a faster rise)
- 4–5 cloves garlic, minced
- 1 cup (about 100g) shredded low-moisture mozzarella cheese
- ¼ cup (25g) grated Parmesan cheese
- 2 tablespoons fresh rosemary, chopped
- Flaky sea salt, for finishing
Instructions
- Mix the Dough (5 minutes): In a large mixing bowl, combine 3 cups (360g) all-purpose flour, 1½ teaspoons salt, and 1 teaspoon instant yeast (if using). Whisk together. Add 1 cup (240g) sourdough discard, 1 cup (240ml) warm water, and ¼ cup (60ml) olive oil. Stir with a wooden spoon until a shaggy, sticky dough forms. Cover the bowl with plastic wrap or a damp towel and let it rest for 30 minutes.
- Stretch and Fold (30 minutes, hands-on time about 2 minutes): After the rest, wet your hands with a little water to prevent sticking. Grab one side of the dough, stretch it up, and fold it over the top. Rotate the bowl a quarter turn and repeat, doing a total of 4 stretches and folds. Cover and let rest for another 30 minutes. Repeat the stretch and fold process one more time.
- First Rise (1 to 1.5 hours): Cover the bowl and let the dough rise at room temperature until it’s doubled in size and bubbly on top, about 1 to 1.5 hours.
- Prepare the Pan and Second Rise (30 minutes): Pour about 2 tablespoons of olive oil into your 9×13-inch baking pan and spread it around to coat the bottom and sides. Gently transfer the dough to the pan. Let the dough rest for 10 minutes, then gently stretch it to the edges of the pan. Cover and let rise for another 30 minutes.
- Dimple and Top (10 minutes): Preheat your oven to 425°F (220°C). Drizzle another tablespoon of olive oil over the dough. Using your fingertips, press deep dimples all over the surface of the dough. In a small bowl, mix the minced garlic with a tablespoon of olive oil. Spoon the garlic mixture over the dough. Sprinkle the shredded mozzarella and grated Parmesan over the top, followed by the chopped rosemary and a generous pinch of flaky sea salt.
- Bake (20-25 minutes): Place the pan in the preheated oven and bake for 20-25 minutes, until the top is golden brown and the cheese is bubbly and starting to brown in spots. Rotate the pan halfway through for even baking.
- Cool and Serve (10 minutes): Remove the focaccia from the oven and let it cool in the pan for 5 minutes. Then transfer it to a wire rack. Let it cool for at least 10 minutes before slicing. Serve warm or at room temperature.
Notes
Don’t skip the stretch and fold—it’s crucial for developing gluten without kneading. Use room temperature discard if possible for a faster rise. Watch your oven closely as baking times may vary. Let the focaccia cool for at least 10 minutes before slicing to allow the cheese to set and steam to redistribute.
Nutrition
- Serving Size: 1/8 of recipe
- Calories: 280
- Sugar: 1
- Sodium: 480
- Fat: 14
- Saturated Fat: 4
- Carbohydrates: 32
- Fiber: 1
- Protein: 8
Keywords: sourdough discard, focaccia, cheesy garlic focaccia, easy focaccia, sourdough bread, discard recipe, garlic bread