Love this? Save it for later!
Share the inspiration with your friends
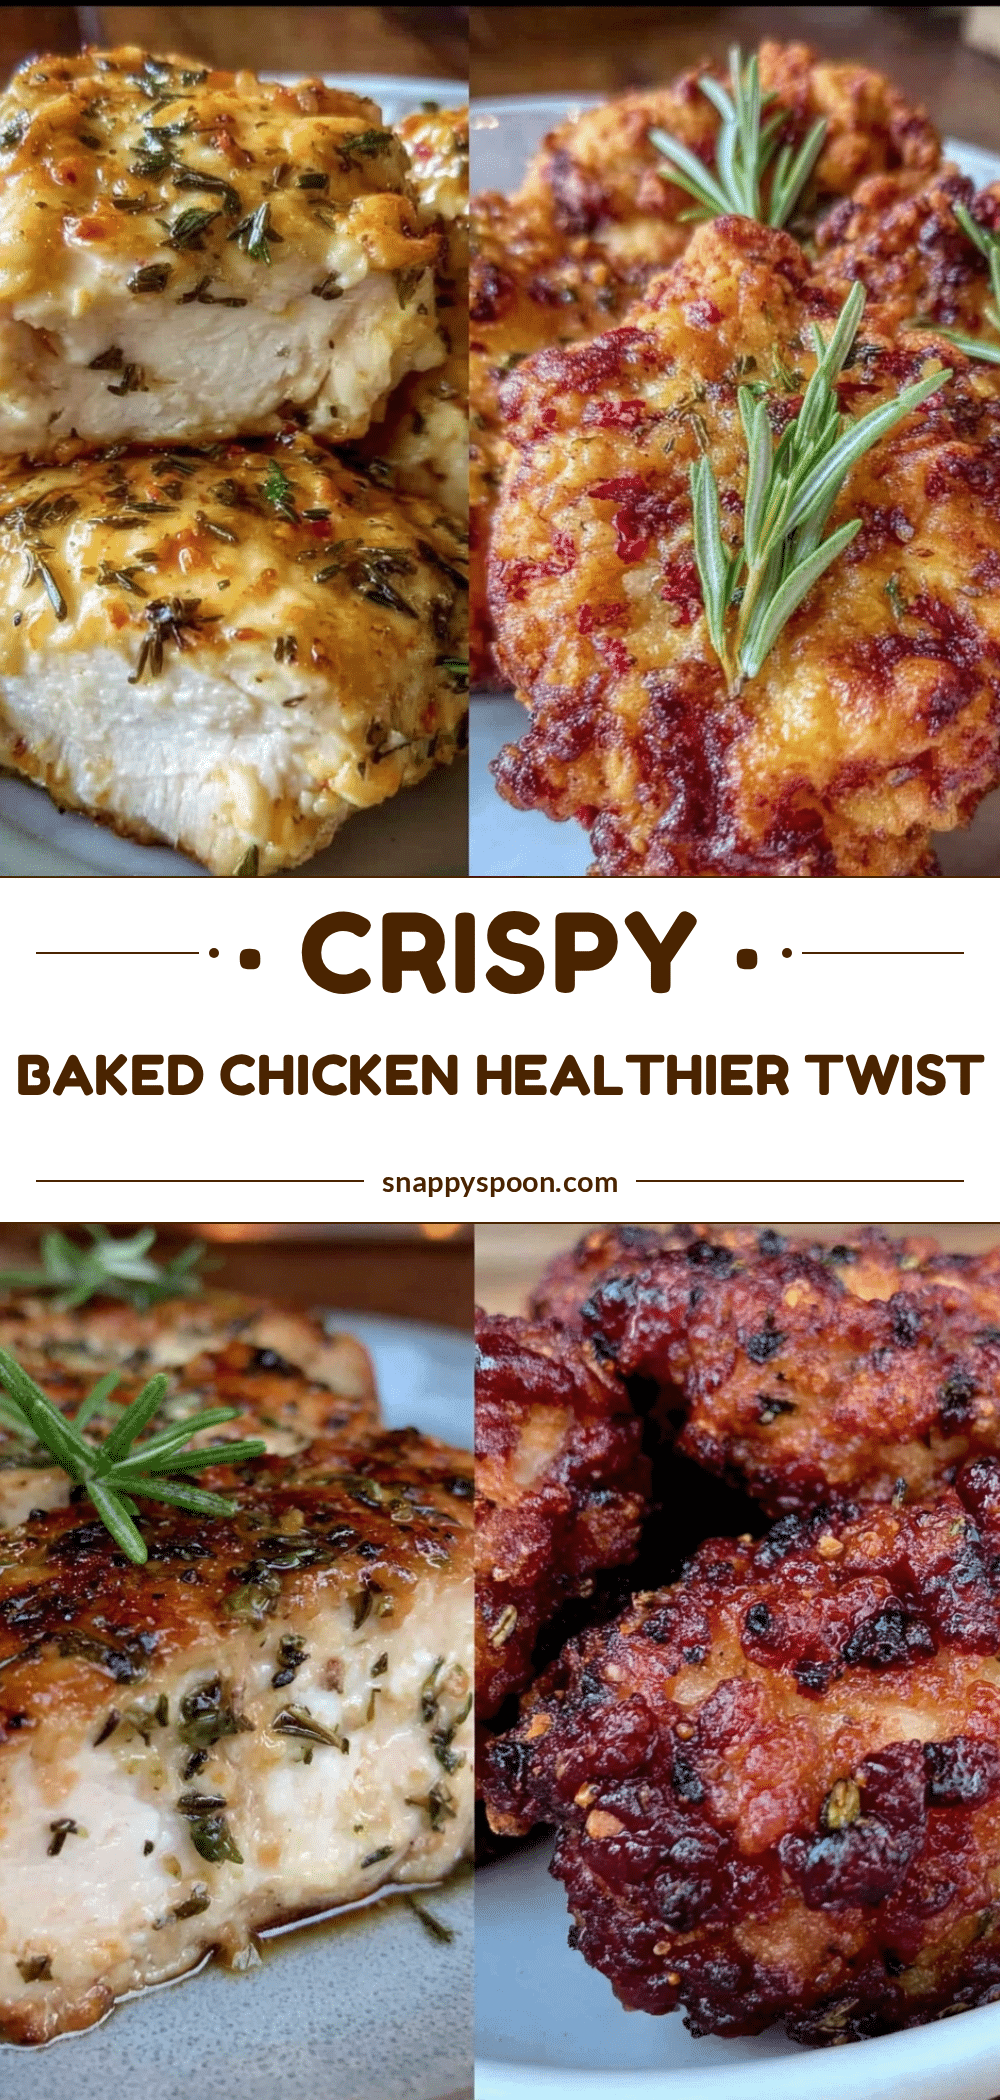
“You’ve got to try the baked one; it’s surprisingly crispy!” my friend Jenna said last Friday night as we debated dinner options over a cluttered kitchen table. Honestly, I was skeptical. I’ve always been team fried chicken—the golden, crunchy, greasy kind that makes your fingers shine like you just dipped them in butter. But Jenna swore by her healthy baked chicken recipe, claiming it hits that crispy note without the guilt. That moment sparked a little culinary challenge for me: could baked chicken really stand up to its crispy fried cousin?
I wasn’t expecting much, but after a few experiments (and a few kitchen mishaps involving too much oil and one slightly burnt batch), I found myself genuinely torn. The baked chicken wasn’t just a healthier alternative; it delivered a texture and flavor I never thought possible without deep frying. I mean, you know that feeling when you bite into something crunchy and juicy, and it just hits all the right spots? That’s what led me down the rabbit hole of comparing healthy baked chicken versus crispy fried chicken.
Maybe you’ve been there too—trying to balance craving that crunchy, satisfying bite with wanting to eat something lighter and better for you. This post is for anyone who’s ever hesitated, torn between comfort food and conscience. Let me tell you, this comparison isn’t just about taste; it’s about understanding what happens when you swap frying for baking, and how to get that crave-worthy crisp without the extra calories. So, grab a napkin (because, let’s face it, chicken is a hands-on affair), and let’s break down the healthy baked chicken vs crispy fried chicken showdown.
Why You’ll Love This Recipe
Having spent countless evenings perfecting both versions, I can confidently say this comparison offers something for everyone. Whether you’re a fried chicken fanatic or just dipping your toes into healthier cooking, these tips and insights come from real kitchen tests, honest taste buds, and a desire to keep dinner both delicious and doable.
- Quick & Easy: Both methods come together in under an hour, perfect for weeknight dinners or last-minute cravings.
- Simple Ingredients: No exotic spices or hard-to-find items—just pantry staples you probably already have.
- Perfect for Any Occasion: Whether it’s a family dinner, weekend cookout, or casual potluck, these recipes fit right in.
- Crowd-Pleaser: Both baked and fried versions get rave reviews from kids and adults alike, making them party favorites.
- Unbelievably Delicious: The texture and flavor combo in both methods deliver comfort food vibes with a twist.
What really makes this comparison stand out is the attention to detail—like how to get that golden crust in the oven (hint: a little oil spray goes a long way) or the secret to perfectly seasoned batter for frying. This isn’t just another fried vs baked debate; it’s about helping you make an informed choice without sacrificing flavor. Honestly, that first bite of baked chicken that crunches just right felt like a little kitchen victory—one I’m excited to share with you.
What Ingredients You Will Need
This healthy baked chicken vs crispy fried chicken comparison uses straightforward, wholesome ingredients to achieve that crave-worthy flavor and texture without fuss. Whether baking or frying, these components play key roles:
- Chicken pieces: Bone-in, skin-on thighs or drumsticks (for juiciness and flavor). I prefer organic or free-range when possible.
- Buttermilk: For marinating the chicken and tenderizing the meat—adds tang and moisture.
- Flour: All-purpose flour for dredging; for a gluten-free twist, use almond flour or rice flour.
- Breadcrumbs or panko: For extra crispiness, especially in the baked version.
- Spices:
- Paprika (smoky depth)
- Garlic powder
- Onion powder
- Salt and black pepper
- Cayenne pepper (optional, for a little heat)
- Eggs: To help the coating stick better, especially in frying.
- Oil: For frying (vegetable or peanut oil works well) and a light spray of olive or avocado oil for baking.
For best results, I recommend using King Arthur all-purpose flour for its consistent texture. When it comes to buttermilk, if you’re out, a simple mix of milk and lemon juice works just fine. Frozen chicken pieces work too, just thaw fully and pat dry before marinating. Pro tip: drying the chicken well before coating helps avoid sogginess and locks in crispiness.
Equipment Needed
- Oven or deep fryer: Oven for baked chicken, deep fryer or heavy-bottomed pot for frying.
- Baking sheet with a wire rack: Allows air to circulate under the chicken for even crisping during baking.
- Large mixing bowls: For marinating and dredging the chicken pieces separately.
- Tongs: Essential for safely flipping and handling hot chicken.
- Thermometer: A digital instant-read thermometer ensures chicken reaches a safe internal temp (165°F / 74°C).
- Paper towels: For draining excess oil from fried chicken (trust me, you’ll want them).
If you don’t have a deep fryer, a large, heavy pot with a thermometer will do the trick—just watch your oil temperature carefully. For baking, investing in a wire rack is a game changer; I’ve tried baking on parchment alone, but the rack helps keep the bottom crispy. Also, if you’re on a budget, a cast-iron skillet can be a versatile tool for pan frying, which is a nice middle ground between deep frying and baking.
Preparation Method

- Marinate the chicken: In a large bowl, combine the chicken pieces with buttermilk, a pinch of salt, and half the spices. Cover and refrigerate for at least 1 hour, or overnight for best flavor and tenderness. (Tip: I once skipped marinating and the chicken was noticeably drier.)
- Prepare the coating: In a separate bowl, mix flour, breadcrumbs or panko, and the remaining spices. Whisk eggs in another shallow dish.
- Coat the chicken: Remove chicken from marinade, letting excess drip off. Dip each piece first in the egg wash, then dredge thoroughly in the flour mixture, pressing gently to adhere. Place coated pieces on a tray to rest for 10 minutes—this helps the crust set.
- For baked chicken: Preheat oven to 425°F (220°C). Arrange chicken on a wire rack set over a baking sheet. Lightly spray the chicken with oil to help with browning. Bake for 35-45 minutes, turning halfway through, until the crust is golden and the internal temperature hits 165°F (74°C). The smell at this point is irresistible!
- For fried chicken: Heat oil in a deep fryer or heavy pot to 350°F (175°C). Fry chicken in batches, avoiding overcrowding, for about 12-15 minutes until golden brown and cooked through. Drain on paper towels. (Warning: watch the oil temp closely—too hot and the crust burns, too cool and the chicken gets greasy.)
Something I learned the hard way: flipping the chicken too often during frying causes the crust to fall off. Let it crisp up undisturbed. Also, resting the chicken after coating but before cooking helps prevent the crust from slipping during frying or baking.
Cooking Tips & Techniques
To get that perfect crunch whether you’re baking or frying, timing and technique are king. Here are some nuggets from my kitchen tests:
- Pat chicken dry: Before marinating, drying the skin slightly helps the coating stick better.
- Don’t skip the rest: Letting coated chicken rest before cooking is a small step that makes a big difference.
- Oil temperature management: For frying, keep your oil between 325°F-350°F (163°C-175°C). Too hot, and the outside burns; too cool, and it absorbs too much oil.
- Use a wire rack when baking: This prevents soggy bottoms by allowing hot air to circulate all around.
- Season generously: Don’t be shy with spices in the flour mix—they bring the flavor home.
- Double-dip for extra crunch: For frying, dipping chicken twice in egg and flour mixture creates a thicker crust.
I remember one batch where I forgot to spray the baked chicken with oil—it came out paler and a bit chewy. Lesson learned: a light mist of oil is essential for that golden, crispy finish. Also, multitasking helps—while chicken marinates, prep your coating and line your baking trays so you’re ready to go. Trust me, it makes the whole process less stressful!
Variations & Adaptations
This comparison isn’t one-size-fits-all, and that’s the fun part. Here are some ways to tweak these recipes to suit your preferences:
- Gluten-free option: Swap all-purpose flour with almond flour or a gluten-free flour blend in both coatings.
- Spice it up: Add smoked paprika, chili powder, or even a dash of cinnamon to the coating for a flavor twist.
- Oven-fried style: Use panko breadcrumbs with a mix of grated Parmesan for a crispy, cheesy baked chicken variant.
- Herb-infused: Mix fresh chopped herbs like thyme, rosemary, or parsley into the flour mixture for an aromatic touch.
- Air fryer adaptation: For a quick, less oily alternative, the coated chicken can be cooked in an air fryer at 400°F (205°C) for about 20 minutes, flipping halfway.
I once tried a lemon pepper version of baked chicken that became a weekend favorite—just added lemon zest and cracked black pepper to the coating. It’s a refreshing change when you want something lighter but still crave that crunch.
Serving & Storage Suggestions
Whether you’re team baked or team fried, serving your chicken hot and fresh is ideal. The crispy crust is best enjoyed right out of the oven or fryer, but here’s how to make leftovers shine:
- Serving temperature: Serve warm with sides like coleslaw, roasted veggies, or mashed potatoes for a classic meal.
- Presentation tips: Garnish with fresh herbs or a squeeze of lemon to brighten flavors.
- Storage: Cool chicken completely before storing in an airtight container. Refrigerate for up to 3 days or freeze for up to 2 months.
- Reheating: Reheat baked chicken in a 375°F (190°C) oven for 10-15 minutes to crisp it back up. For fried, use a wire rack in the oven to avoid sogginess.
- Flavor development: Leftover chicken tends to mellow—pair with a tangy dipping sauce or a quick side salad to revive it.
Nutritional Information & Benefits
Choosing baked chicken over fried can reduce calories and fat significantly—baked versions typically have 30-50% less fat depending on coating and oil used. Using skin-on chicken keeps moisture and flavor intact, reducing the need for extra fat.
Key ingredients like buttermilk add protein and calcium, while spices provide antioxidants. Opting for whole-grain breadcrumbs or almond flour adds fiber or healthy fats. This recipe is naturally gluten-free with substitutions and can be tailored for low-carb diets.
Be mindful that fried chicken contains more saturated fat and calories, which may not fit all dietary needs. Personally, I find the baked version easier on digestion without sacrificing that satisfying crunch—perfect for those wanting comfort food without the guilt.
Conclusion
This healthy baked chicken vs crispy fried chicken comparison isn’t about declaring a winner. It’s about empowering you with options to fit your lifestyle and cravings. I love how the baked version lets me enjoy that signature crunch with less mess and fewer calories, but I’ll never say no to a classic fried piece when the mood strikes.
Try both, tweak the seasonings, and make it your own. And hey, if you have a favorite twist on these methods, I’d love to hear about it in the comments. Sharing recipes and stories is what keeps the kitchen exciting and alive.
So go ahead, get your hands a little messy, and savor every crunchy, juicy bite. Happy cooking!
FAQs
Can I use boneless chicken for these recipes?
Absolutely! Boneless chicken breasts or thighs work well, but reduce cooking time and watch closely to avoid drying out.
Is baking chicken really healthier than frying?
Generally, yes. Baking uses less oil, which cuts calories and fat, but both methods can be enjoyed in moderation.
How do I keep baked chicken crispy?
Using a wire rack and lightly spraying oil on the coating helps keep it crispy. Also, avoid overcrowding the pan.
Can I prepare the chicken coating ahead of time?
You can mix dry ingredients ahead, but coat the chicken just before cooking for best texture.
What’s the best oil for frying chicken?
Vegetable, peanut, or canola oil with a high smoke point are ideal. They withstand frying temperatures without burning.
For those curious about other delicious chicken preparations, my crispy garlic chicken recipe offers another flavorful option, and if you love baking, the oven roasted herb chicken is a simple, aromatic meal worth trying.
Pin This Recipe!
Healthy Baked Chicken vs Crispy Fried Chicken

A detailed comparison and recipe guide for making crispy, juicy chicken using healthy baked and classic fried methods, offering tips to achieve perfect texture and flavor without the guilt.
- Prep Time: 1 hour 15 minutes
- Cook Time: 45 minutes
- Total Time: 2 hours
- Yield: 4 servings
- Category: Main Course
- Cuisine: American
Ingredients
- Bone-in, skin-on chicken thighs or drumsticks (organic or free-range preferred)
- Buttermilk (or milk mixed with lemon juice as a substitute)
- All-purpose flour (King Arthur recommended; almond flour or rice flour for gluten-free option)
- Breadcrumbs or panko (for extra crispiness, especially in baked version)
- Paprika
- Garlic powder
- Onion powder
- Salt
- Black pepper
- Cayenne pepper (optional)
- Eggs
- Vegetable or peanut oil for frying
- Olive or avocado oil spray for baking
Instructions
- Marinate the chicken: Combine chicken pieces with buttermilk, a pinch of salt, and half the spices in a large bowl. Cover and refrigerate for at least 1 hour or overnight for best flavor and tenderness.
- Prepare the coating: In a separate bowl, mix flour, breadcrumbs or panko, and the remaining spices. Whisk eggs in another shallow dish.
- Coat the chicken: Remove chicken from marinade, letting excess drip off. Dip each piece first in the egg wash, then dredge thoroughly in the flour mixture, pressing gently to adhere. Place coated pieces on a tray to rest for 10 minutes to help the crust set.
- For baked chicken: Preheat oven to 425°F (220°C). Arrange chicken on a wire rack set over a baking sheet. Lightly spray the chicken with oil to help with browning. Bake for 35-45 minutes, turning halfway through, until crust is golden and internal temperature reaches 165°F (74°C).
- For fried chicken: Heat oil in a deep fryer or heavy pot to 350°F (175°C). Fry chicken in batches, avoiding overcrowding, for about 12-15 minutes until golden brown and cooked through. Drain on paper towels.
Notes
Pat chicken dry before marinating to help coating stick better. Let coated chicken rest before cooking to set crust. Maintain oil temperature between 325°F-350°F for frying to avoid greasy or burnt crust. Use a wire rack when baking to prevent soggy bottoms. Lightly spray oil on baked chicken for golden crispiness. Double-dip chicken in egg and flour mixture for extra crunchy fried crust. Leftover baked chicken can be reheated in a 375°F oven for 10-15 minutes to restore crispiness.
Nutrition
- Serving Size: 1 chicken thigh or d
- Calories: 0.32
- Sugar: 1
- Sodium: 450
- Fat: 14
- Saturated Fat: 3.5
- Carbohydrates: 15
- Fiber: 1.5
- Protein: 32
Keywords: baked chicken, fried chicken, healthy chicken recipe, crispy chicken, easy chicken recipe, gluten-free chicken, oven fried chicken, comfort food