Love this? Save it for later!
Share the inspiration with your friends
I was stuck in the longest line at the grocery store, the one where the conveyor belt has that weird squeak. I was mentally planning dinner, feeling that familiar afternoon slump, when the cashier, a guy named Leo with a sleeve of tattoos, nodded at my cart full of apples and said, “You know, the secret to getting my kids to eat fruit was putting it on a stick.” He laughed, rang up my bananas, and added, “I call ’em rainbow sticks. It’s the only way they’ll touch a grape.” I wasn’t expecting lunch inspiration from a guy scanning my loyalty card, but there I was, listening to Leo describe exactly how to make the most colorful, kid-friendly snack I’d ever heard of. Honestly, it was one of those moments where you realize the best ideas come from the most unexpected places.
That conversation completely shifted my perspective on lunch prep. I mean, we all know the struggle of packing a lunch that actually comes back empty. You chop the fruit, you arrange it nicely, and it still feels like a chore. But the idea of rainbow fruit skewers? It felt like a little bit of magic. It turned a simple snack into an event. The first time I made these, my own kitchen looked like a craft fair exploded. There were strawberries rolling off the counter and a few blueberries that escaped under the fridge. But when I presented the skewers to my family, the silence that followed was pure victory. Maybe you’ve been there, watching your kids (or, let’s be real, yourself) pick around the healthy stuff. This was different. This was fun.
These easy rainbow fruit skewers for lunch became our go-to for a reason. They solved the boring lunch problem without any fuss. You can prep them in ten minutes flat, and they look like something from a fancy brunch spot. The colors are so bright, they practically dare you not to smile. And honestly, seeing a row of these on a plate makes me feel like I’ve got my life together, even if the rest of the house is a mess. That’s why this recipe stuck with me. It’s not just about eating fruit; it’s about making the act of eating a little more joyful. It’s a small, colorful rebellion against the beige lunch box.
Why You’ll Love This Recipe
Let’s be real—getting a healthy lunch on the table can feel like a battle. But these rainbow fruit skewers aren’t just another recipe; they’re a game-changer. I’ve tested this with my own picky eaters and at playdates, and it always gets the same reaction: pure, unadulterated joy. Here’s why this is the best version you’ll find.
- Quick & Easy: Comes together in under 10 minutes. Seriously. If you can wash fruit and push it onto a stick, you’ve got this. Perfect for those mornings when you’re running late or need a last-minute snack for a school party.
- Simple Ingredients: No fancy grocery trips needed. You likely already have everything in your kitchen. We’re talking basic berries, melon, and grapes. It’s the kind of recipe that uses up whatever is in your fruit bowl.
- Perfect for Lunchboxes: These are a lifesaver for packed lunches. They’re mess-free, fun to eat, and kids actually look forward to them. They also make a fantastic appetizer for brunch or a healthy dessert for a barbecue.
- Crowd-Pleaser: I’ve never met a kid (or adult) who can resist a rainbow on a stick. They always get rave reviews, and they’re the first thing to disappear at any gathering.
- Unbelievably Delicious: The combination of sweet, tart, and juicy fruits is pure perfection. It’s nature’s candy, but better because it looks like a work of art.
What makes these different from just a regular fruit salad? It’s the presentation. The act of threading fruit onto skewers turns a simple snack into an interactive experience. It’s a creative twist that makes healthy eating feel like a treat. This isn’t just another fruit platter—it’s the kind of snack that makes you close your eyes after the first bite. It’s comfort food reimagined: faster, healthier, but with the same soul-soothing satisfaction. Perfect for impressing guests without any stress, or turning a simple lunch into something memorable.
What Ingredients You Will Need
This recipe uses simple, wholesome ingredients to deliver a burst of flavor and color. The beauty is in the simplicity—these are all pantry staples or easy-to-find fresh fruits. Here’s what you’ll need to build your rainbow.
- Strawberries: About 1 cup, hulled and halved if large. They provide that brilliant red and a sweet, slightly tart flavor. Look for bright red berries with fresh green tops for the best taste. (I like to use organic strawberries when I can find them.)
- Oranges or Mandarin Oranges: 1 large orange, peeled and segmented, or 1 can of mandarin oranges, drained. These add a pop of orange color and juicy sweetness. If using fresh, make sure to remove all the white pith.
- Pineapple: 1 cup of fresh pineapple chunks. The golden yellow is essential for the rainbow, and its tropical sweetness balances the other fruits. Canned pineapple works in a pinch, but fresh has a better texture.
- Green Grapes: 1 cup of seedless green grapes. They provide the green layer and a satisfying pop when you bite into them. Look for firm, plump grapes that are free from wrinkles.
- Blueberries: 1 cup of fresh blueberries. These are the blue/purple component, and they’re packed with antioxidants. Make sure they are dry and firm, not mushy.
- Purple Grapes or Blackberries: 1 cup of purple grapes or fresh blackberries. This completes the rainbow with a deep purple hue. Blackberries add a slightly tart, earthy flavor that’s a nice contrast to the sweeter fruits.
For the Skewers:
- Wooden or Bamboo Skewers: 6-8 inch skewers work best. You can find them at any grocery store. For kids, you can use shorter skewers or even sturdy plastic ones.
Ingredient Tips: I recommend using a mix of textures—soft berries with firmer melon and grapes—for the best eating experience. If you’re making these ahead, choose fruits that don’t brown quickly, like grapes and melon. Avoid apples and pears unless you plan to serve them immediately. For a fun twist, you can add a small drizzle of honey or a squeeze of lime juice over the assembled skewers, but they’re fantastic on their own.
Substitutions: Feel free to swap in any fruit you have on hand. Raspberries for the red, mango for the orange, kiwi for the green, or even star fruit for a fun shape. The key is to keep the colors bright and varied. Use whatever is in season for the best flavor and price.
Equipment Needed
You don’t need a professional kitchen to make these rainbow fruit skewers. Just a few basic tools will do the trick. Here’s what I use and some tips I’ve learned along the way.
- Cutting Board: A large, sturdy cutting board is essential. I prefer a wooden one because it’s gentle on my knives, but any clean surface works.
- Sharp Knife: A good chef’s knife or a paring knife makes quick work of hulling strawberries and cutting pineapple. A sharp knife is safer and gives you cleaner cuts.
- Skewers: You’ll need 6-8 inch wooden or bamboo skewers. I usually buy a big bag from the store. For younger kids, you can use short, blunt-ended skewers or even clean popsicle sticks to avoid any sharp points. (I once tried using metal skewers, and they were a pain to clean—stick to wood!)
- Mixing Bowl: A large bowl to hold your prepped fruit before assembly. It helps keep your workspace organized.
- Paper Towels: Patting the fruit dry is a step you don’t want to skip. Wet fruit makes the skewers slippery and can make them slide around on the plate.
That’s it! No fancy gadgets required. You probably already have all of this in your kitchen drawers. If you don’t have skewers, you can even use sturdy toothpicks for mini skewers—perfect for a toddler’s lunch.
Preparation Method
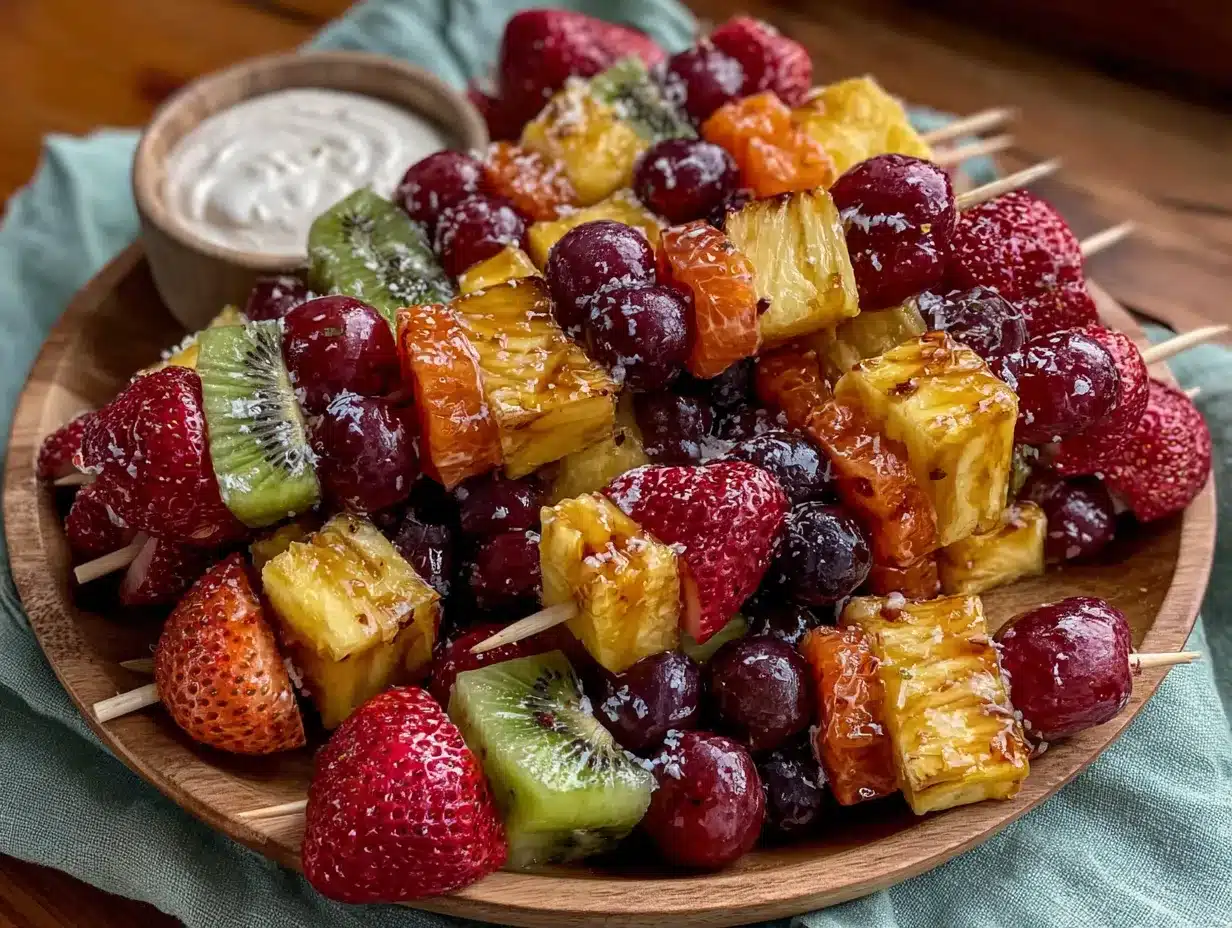
Making these rainbow fruit skewers for lunch is incredibly straightforward. Follow these steps, and you’ll have a beautiful, healthy snack in no time. I’ve added some of my own little tricks to make the process even smoother.
- Wash and Dry All Fruit: Start by thoroughly washing all your fruit under cold running water. This is crucial to remove any dirt or residue. Then, lay the fruit out on a clean kitchen towel or paper towels and pat them completely dry. This step is key! Wet fruit is slippery and harder to thread onto the skewers. It also makes the skewers look messy and can cause the fruit to slide around. Take the extra minute to dry everything well.
- Prep the Fruit: Now, let’s get chopping. Hull the strawberries and cut them in half (or quarters if they are very large). Peel and segment the orange, removing as much of the white pith as possible. Cut the pineapple into bite-sized chunks, about 1-inch cubes. Leave the green grapes and blueberries whole. If using purple grapes, leave them whole as well. If using blackberries, keep them whole. The goal is to have all the pieces roughly the same size so your skewers look uniform and balanced.
- Arrange Your Rainbow: This is the fun part. Lay out your prepped fruit in separate bowls or on a plate in the order of the rainbow: red, orange, yellow, green, blue, purple. This visual lineup makes the assembly process a breeze and ensures you don’t miss a color.
- Assemble the Skewers: Take a skewer and start threading the fruit. Begin with a strawberry (red), then add an orange segment (orange), followed by a pineapple chunk (yellow), a green grape (green), a blueberry (blue), and finally a purple grape or blackberry (purple). Repeat this pattern until the skewer is full, leaving about an inch of space at the bottom for a handle. Pro tip: Gently push the fruit together, but don’t squish it. You want the colors to be visible and the fruit to stay intact.
- Repeat: Continue assembling the skewers until you’ve used all your fruit. This recipe usually makes about 8-10 standard-sized skewers, depending on how full you pack them.
- Serve Immediately or Chill: For the best texture and flavor, serve the skewers right away. If you need to make them ahead, arrange them in a single layer on a plate, cover with plastic wrap, and refrigerate for up to 2 hours. They are best enjoyed fresh, as the fruit can start to release its juices and become a little slippery over time.
Troubleshooting Tip: If your fruit is sliding around on the skewer, it’s probably too wet or cut too large. Make sure your pieces are bite-sized and dry. If a piece of fruit is particularly soft, like a very ripe strawberry, you can thread it onto the skewer carefully, supporting it with your fingers.
Cooking Tips & Techniques
Over the years, I’ve made these skewers dozens of times, and I’ve learned a few things the hard way. Here are my best tips to ensure your rainbow fruit skewers turn out perfect every single time.
- The Drying Rule: I cannot stress this enough—dry your fruit! I once skipped this step in a rush, and my skewers looked like a sad, drippy mess. The fruit kept sliding off, and the plate was full of juice. Patting the fruit dry with a paper towel is the single most important step for a professional-looking result.
- Uniform Sizing: Try to cut all your fruit into similar-sized pieces. This isn’t just about looks; it ensures that each bite has a balanced mix of flavors. A huge chunk of pineapple next to a tiny blueberry makes for an awkward bite. Aim for 1-inch cubes or halves.
- Use a “Handle”: Leave about an inch of the skewer bare at the bottom. This gives little hands something to hold onto without touching the fruit. It’s a simple gesture that makes eating much less messy, especially for kids.
- Sharp Skewers: If you’re using wooden skewers, you can gently snip off the very sharp point with kitchen shears. This makes them safer for children and prevents anyone from getting poked. It’s a small step that adds a lot of peace of mind.
- Mix It Up: Don’t feel like you have to stick to the exact order of the rainbow. You can make all-red skewers, or a mix of only berries. The rainbow pattern is just a suggestion—the most important thing is that it’s fun to eat.
Variations & Adaptations
One of the best things about these easy rainbow fruit skewers for lunch is how customizable they are. You can adapt them to any season, dietary need, or personal preference. Here are a few of my favorite variations.
- Seasonal Rainbow: In the summer, swap in fresh peaches for the orange and watermelon for the red. In the fall, use apple chunks (tossed in lemon juice to prevent browning) and pear slices. In the winter, use clementines and pomegranate arils for a festive twist.
- Tropical Twist: Go for an island vibe by using mango for the orange, papaya for the yellow, and kiwi for the green. Add a drizzle of coconut cream or a sprinkle of toasted coconut flakes over the top for extra flavor.
- Chocolate Drizzle: For a dessert version, arrange the skewers on a plate and drizzle with melted dark chocolate or white chocolate. Let it set in the fridge for a few minutes. It’s a healthy-ish treat that feels incredibly indulgent. (I tried this once for a party, and they vanished in minutes.)
- Yogurt Dip: Serve the skewers with a side of Greek yogurt mixed with a little honey and vanilla extract. It adds protein and makes for a more filling snack or breakfast. You can also use a dairy-free coconut yogurt for a vegan option.
- Frozen Fruit Skewers: For a hot day, use frozen grapes and frozen berries. They act like little popsicles and are incredibly refreshing. Just be aware that they will thaw quickly, so serve them immediately.
Serving & Storage Suggestions
These rainbow fruit skewers are best enjoyed fresh, but they can be prepped ahead with a few simple tricks. Here’s how to serve and store them for the best experience.
Serving: Serve the skewers chilled or at room temperature. They look gorgeous arranged on a large platter, fanning them out like a rainbow. For a party, you can stand them up in a tall glass or a hollowed-out pineapple for a stunning centerpiece. They pair beautifully with a side of yogurt dip, a drizzle of honey, or even a sprinkle of granola for crunch.
Storage: If you have leftovers (which is rare in my house!), store them in an airtight container in the refrigerator. Place a paper towel at the bottom of the container to absorb any excess moisture. They will keep for about 24 hours, but they are best within 4-6 hours of making. The fruit will start to release its juices, making the skewers a bit slippery, but they are still perfectly safe to eat.
Make-Ahead Tip: You can prep all the fruit up to a day in advance. Store each type of fruit in separate airtight containers in the fridge. Then, simply assemble the skewers right before serving. This is a huge time-saver for parties or busy mornings.
Reheating: Do not reheat these! They are meant to be served cold or at room temperature. Heating them will turn the fruit into a mushy mess.
Nutritional Information & Benefits
These rainbow fruit skewers are a powerhouse of nutrition, wrapped in a fun, colorful package. Here’s a quick look at what you’re getting in each serving (based on one skewer).
Estimated Nutritional Values (per skewer):
- Calories: 60-80
- Carbohydrates: 15-20g
- Fiber: 2-3g
- Sugar: 10-15g (natural)
- Vitamin C: 30-40% of your daily needs
- Vitamin A: 5-10% of your daily needs
Health Benefits: Each fruit brings its own set of benefits. Strawberries and blueberries are packed with antioxidants that support your immune system. Oranges provide a huge dose of Vitamin C. Pineapple contains bromelain, an enzyme that aids digestion. Grapes are a great source of hydration and potassium. This is a snack that truly nourishes your body from the inside out.
Dietary Considerations: This recipe is naturally gluten-free, dairy-free, vegan, and nut-free. It’s a safe and healthy option for almost any dietary restriction. The only potential allergen is the fruit itself for those with specific fruit allergies. It’s a perfect, clean-eating snack for everyone.
Conclusion
So, there you have it. The easiest, most joyful way to get a healthy lunch on the table. These easy rainbow fruit skewers for lunch are more than just a snack; they’re a little moment of happiness. They turn a simple bowl of fruit into an adventure, and they make healthy eating feel like a celebration. I love how they bring a smile to everyone’s face, from the youngest picky eater to the most seasoned adult.
I honestly believe this is one of those recipes you’ll come back to again and again. It’s forgiving, it’s fun, and it’s a guaranteed crowd-pleaser. I encourage you to make this your own—swap in your favorite fruits, try a new dip, or just enjoy them as they are. The best part is, there’s no wrong way to do it.
I’d love to hear how your rainbow skewers turn out! Did you try a fun variation? Did your kids gobble them up? Drop a comment below and share your creation. And if you loved this recipe, please share it with a friend who needs a little more color in their lunch routine. Happy snacking, friends!
Frequently Asked Questions
Can I make these fruit skewers the night before?
Yes, you can! For the best results, prep all your fruit the night before and store each type in a separate airtight container in the fridge. Assemble the skewers right before serving. If you assemble them too far in advance, the fruit can release its juices and make the skewers slippery.
What if I don’t have wooden skewers?
No problem! You can use sturdy plastic skewers, clean popsicle sticks, or even long toothpicks for mini skewers. For a fun, eco-friendly option, try using rosemary sprigs or lemongrass stalks as skewers—they add a subtle flavor!
How do I keep the fruit from turning brown?
Most of the fruits in this recipe, like berries and grapes, don’t brown easily. If you add apples or pears, toss them in a little lemon juice or pineapple juice before threading them onto the skewer. This will help them stay bright and fresh-looking.
Can I use frozen fruit for these skewers?
Yes, you can, but with a caveat. Frozen fruit will thaw quickly and release a lot of water, making the skewers soggy. It’s best to use fresh fruit for the best texture. However, frozen grapes or berries are fantastic for a frozen treat on a hot day—just serve them immediately!
Are these fruit skewers safe for toddlers?
Absolutely! Just take a few precautions. Use short, blunt-ended skewers or clean popsicle sticks instead of sharp wooden ones. Cut the fruit into very small, bite-sized pieces that are safe for little mouths. You can also serve the fruit pieces in a bowl without the skewer for very young children.
Pin This Recipe!
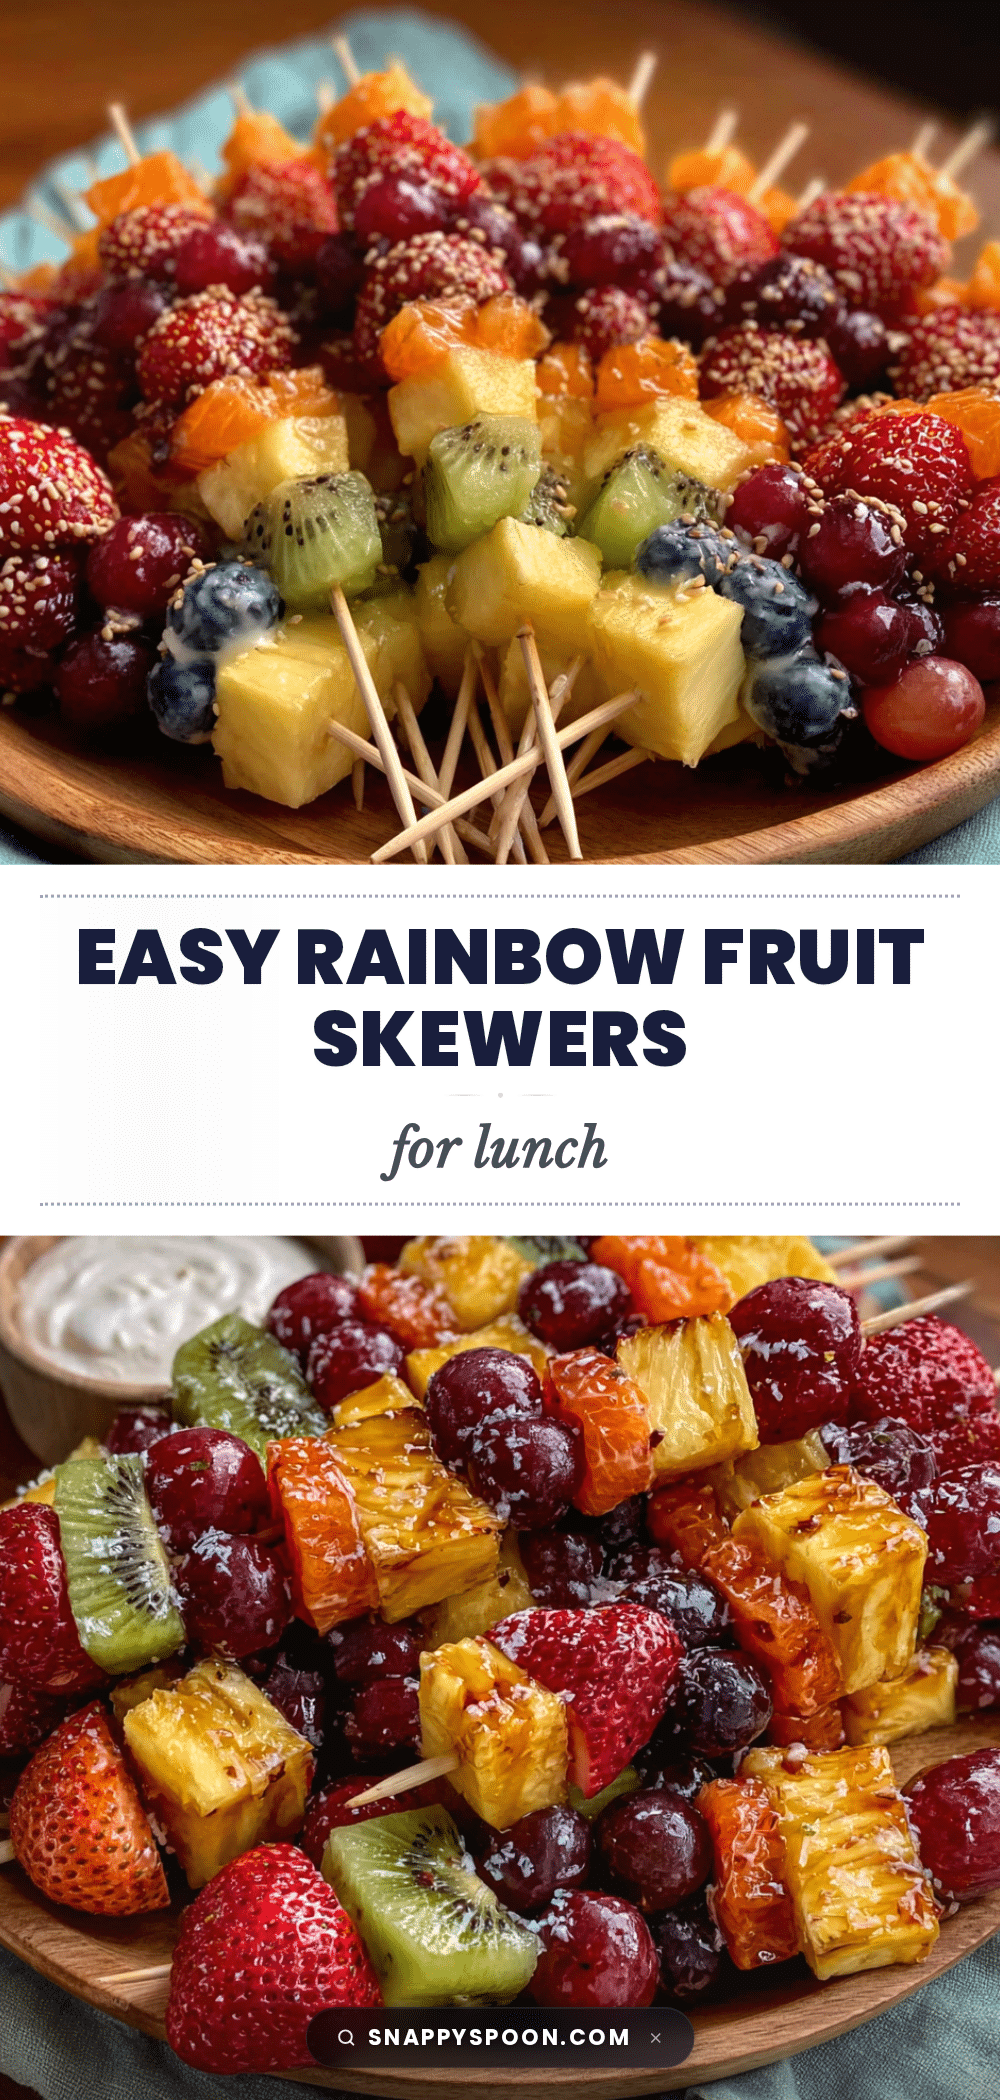
Best Easy Rainbow Fruit Skewers for Lunch
These easy rainbow fruit skewers are a fun, colorful, and healthy snack that comes together in under 10 minutes. Perfect for lunchboxes, parties, or a quick treat, they turn simple fruit into an interactive experience that kids and adults love.
- Prep Time: 10 minutes
- Cook Time: 0 minutes
- Total Time: 10 minutes
- Yield: 8-10 skewers 1x
- Category: Snack
- Cuisine: American
Ingredients
- 1 cup strawberries, hulled and halved if large
- 1 large orange, peeled and segmented (or 1 can mandarin oranges, drained)
- 1 cup fresh pineapple chunks
- 1 cup seedless green grapes
- 1 cup fresh blueberries
- 1 cup purple grapes or fresh blackberries
- 6–8 inch wooden or bamboo skewers
Instructions
- Wash and dry all fruit thoroughly with paper towels.
- Prep the fruit: hull strawberries and cut in half or quarters; peel and segment orange; cut pineapple into 1-inch chunks; leave green grapes, blueberries, and purple grapes whole.
- Arrange prepped fruit in separate bowls in rainbow order: red, orange, yellow, green, blue, purple.
- Assemble skewers: starting with a strawberry (red), then orange segment (orange), pineapple chunk (yellow), green grape (green), blueberry (blue), and purple grape or blackberry (purple). Repeat pattern until skewer is full, leaving about 1 inch bare at the bottom for a handle.
- Repeat with remaining fruit to make 8-10 skewers.
- Serve immediately or refrigerate in a single layer, covered, for up to 2 hours.
Notes
Dry fruit thoroughly to prevent slipping. Cut fruit into uniform bite-sized pieces for even skewers. For kids, snip off sharp skewer points or use popsicle sticks. Best served fresh; can be prepped a day ahead (store fruit separately, assemble before serving).
Nutrition
- Serving Size: 1 skewer
- Calories: 70
- Sugar: 12
- Sodium: 2
- Fat: 0.5
- Carbohydrates: 17
- Fiber: 3
- Protein: 1
Keywords: rainbow fruit skewers, fruit skewers, healthy snack, kid-friendly, lunchbox idea, easy fruit recipe, rainbow sticks